Intranet / Domain only access to the web portal
Security considerations
Configuring the web portal for Internal Intranet (Domain network) access only is much easier to configure than if it’s opened up to Internet access. Much of the security concerns are eliminated in this case but it’s still highly recommended that it be secured with an SSL certificate, even if it is only an internally generated certificate.
 Permissions checklist!
To complete this step, you will need:
- Domain Administrator access to the HelpMaster or IIS server hosting the web portal
- Domain Administrator access to the internal Domain DNS and Group Policies
- Administrator access to your Certificate Authority (CA) server
- HelpMaster administrative access
- Experience or certification configuring Internet Information Services (IIS)
Configuration options
Various configuration options are available and will depend upon your organisations requirements. Here are a couple of common configuration options.
Quickest and easiest
The quickest and easiest configuration is to deploy the web portal directly to a dedicated HelpMaster server for internal use only. In this scenario the default unauthenticated home page url would be the machine’s Fully Qualified Domain Name (FQDN) name, followed by the assigned port number e.g. https://hmserver.domain.local:4433 or just https://hmserver.domain.local if using the default https port 443. No internal DNS entries are required as the machine name is already registered in DNS via DHCP assignment in a Domain network. Also browser configuration and trusted site settings don’t need to be configured as the default domain policy will suffice. A Self-signed SSL certificate can be created from IIS, and may be used to secure the web site. This Self-signed SSL certificate can then be exported and imported to other domain machines for secure connections. It can also be deployed to all or select client machines’ Trusted Root Certificate via Group Policy. You may ignore the following instructions if this simple configuration option is chosen.
Using a dedicated host name
If a new alias host name in the url is required for internal use only e.g. https://support.domain.local, then additional configuration is required such as creating an internal DNS record to point to the new host name. Also browser trusted site configuration options may have to be configured to cater for the new host name and to allow Windows authentication. See steps 1 and 2 outlining these configuration requirements.
For a unique Fully Qualified Domain Name (FQDN) e.g. https://support.wizbangwidgets.com a new DNS Forward Lookup Zone for wizbangwidgets.com would need to be created along with the new host name support as outlined in Step 3 below.
Step 1: Add a new DNS record to point to the web portal host alias
Follow the steps below to add a custom DNS CNAME record which points to a generated sub-domain (alias) of your internal domain e.g. https://support.domain.local. A CNAME record will point to the existing name of the host computer e.g. hmserver.domain.local so no further DNS or DHCP configuration will be required for this option.
- Sign in to your internal Microsoft DNS server as a Domain Administrator and open the DNS Manager management console
- Expand the Forward Lookup Zones tree and select your internal domain name to see all internal domain DNS records
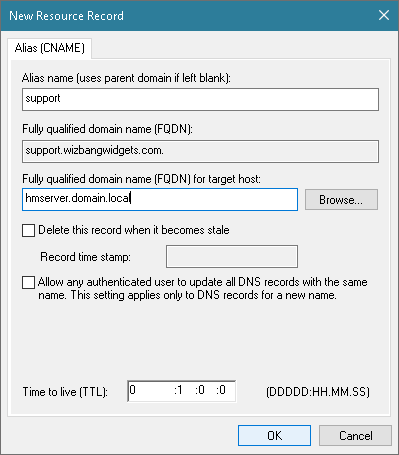
- To create a new sub-domain (alias) choose New Alias (CNAME)…
- Enter the new host name into the Alias name field e.g. support
- Enter the Fully qualified domain name (FQDN) for target host to the original host name e.g. hmserver.domain.local
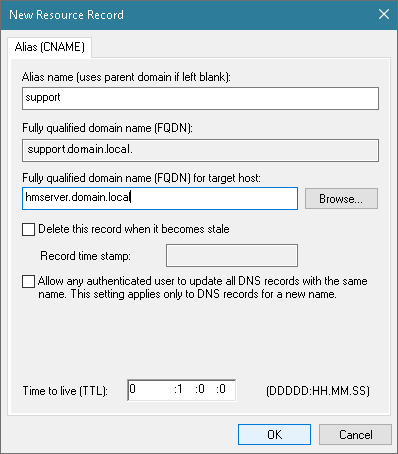
- Click OK to save the record.
On other hosts you may need to flush the DNS cache by running the following command from a CMD or powershell console before the new host name can be resolved.
ipconfig /flushdnsStep 2: Adding browser trusted sites
In order to be able to browse to and Windows authenticate with the HelpMaster web portal, any host names/urls may need to be added as trusted sites to your browser configuration as follows.
Microsoft Edge, and Google Chrome browsers
- Open Internet Options from Control Panel (or from Internet Explorer on the Tools menu) and click on the Security tab
- Click on the Local intranet zone, then click the Sites button followed by Advanced
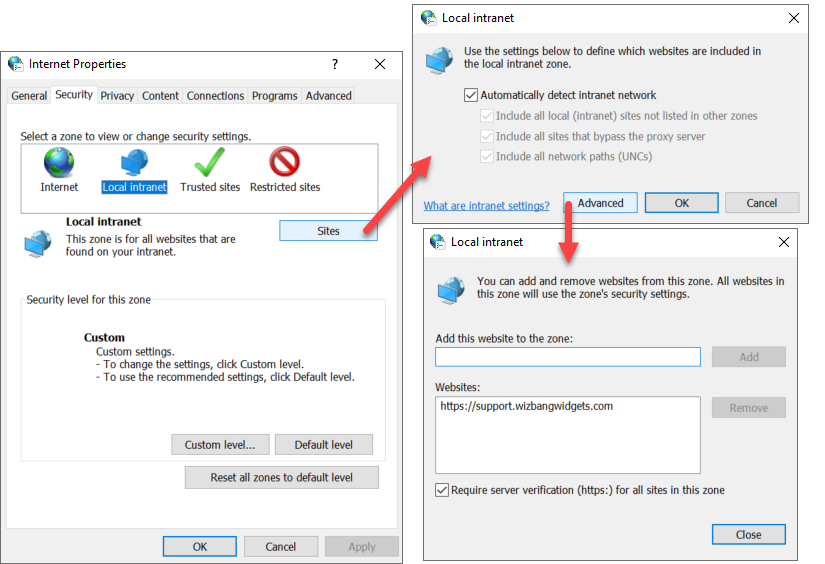
- Add your HelpMaster server IIS Host FQDN e.g. https://support.domain.local to the Websites: list
- Now click on the Custom level… button and scroll to the bottom of the Settings list
- The setting Automatic logon in Intranet zone should be selected
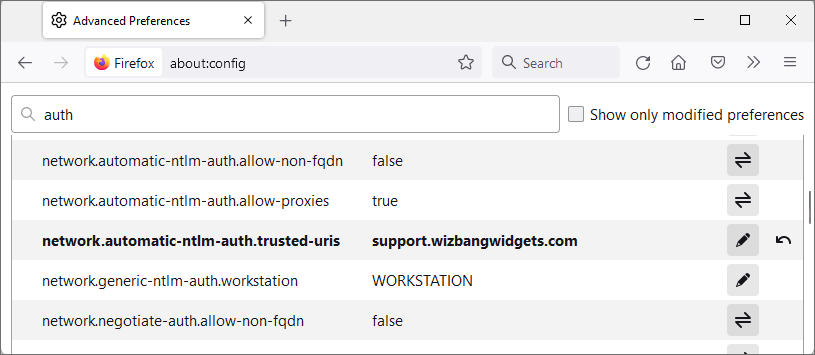
Firefox This is outside the scope of ordinary configuration options that are available in Firefox. So it must be configured using advanced about:config configuration pages.
- Open your Firefox browser
- In the address bar type about:config and hit enter
- In the filter, type auth and hit enter
- Locate the entry network.automatic-ntlm-auth.trusted-uris, double click on this entry and add the HostName to the Value property where HostName is either the machine name or the designated IIS [HostName] of the Web Server serving the HelpMaster requests. For instance, if the web portal is hosted at https://support.wizbangwidgets.com, add support.wizbangwidgets.com to the list. Multiple items may be added using a comma (,) separator
If any of the above options are not available for change then please contact your domain administrator to update these options via Group Policy.
Step 3: Creating a unique FQDN via a DNS Forward Lookup Zone
In order to create an internal only FQDN e.g. https://support.wizbangwidgets.com you will need to create a new forward lookup zone in DNS as follows.
- Sign in to your internal Microsoft DNS server as a Domain Administrator and open the DNS Manager management console
- Expand the DC server tree and right click on Forward Lookup Zones, then select New Zone…
- This will open the New Zone Wizard welcome screen, click Next >
- Select the Zone Type Primary Zone and click Next >
- Select the Replication Scope you would like and click Next >
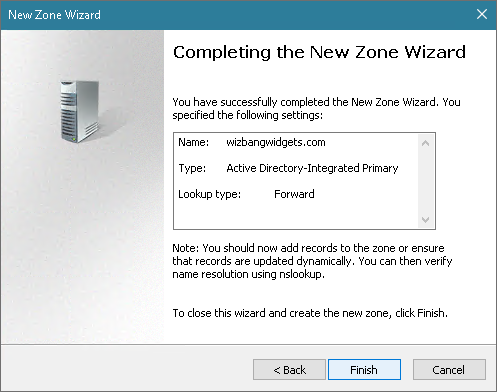
- Enter the domain name you would like without the host name e.g. wizbangwidgets.com and click Next >
- For internal use only select Allow only secure dynamic updates… and click Next >
- On the completion screen, check your summary and click Finish
- Now expand the Forward Lookup Zones, select and right click on your new zone. Select New Alias (CNAME)…
- Enter the Alias name e.g. support, and browse to, or enter the target host name e.g. hmserver.domain.local
- Click OK to save the record.
On other hosts you may need to flush the DNS cache by running the following command from a CMD or powershell console before the new host name can be resolved.
ipconfig /flushdnsSee Also
Configuring application settings
Setting and resetting client passwords
Feedback
Was this page helpful?
Glad to hear it! Please tell us how we can improve.
Sorry to hear that. Please tell us how we can improve.