Linking entities to a job
Each job has the ability to link to different entities such as clients, assets, knowledge base articles and even other jobs.
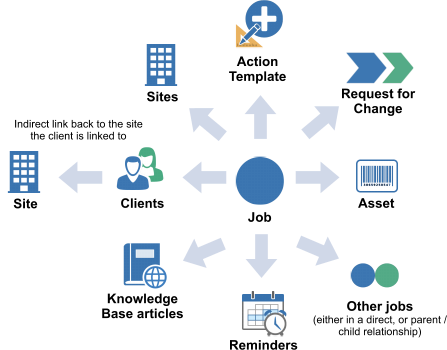
There is no limit to the number of individual entities that can be linked to a job. For example, a job can link to 1 client, or 20 clients. It can at the same time link to 2 assets, and 5 other jobs.
By default, each job must link to at least 1 client.
Why link entities to jobs?
When an entity links to a job, it give greater meaning and context to that job. For example. If a particular asset, say a printer was linked to a job, then the staff member viewing that job would be able to easily see the relationship and conclude that the printer is a main issue in the job.
Linking other entities also allows automation events (Priority Manager and Triggered Events) to target the link as part of the search criteria and then perform some action on the linked entity, or the entities it is linked to.
Links also add meaningful data to reports and statistics that can later be used for things like service level agreements, performance analysis and other data-related tasks.
Linking other jobs to jobs is also a good way to create workflow and dependencies in related items.
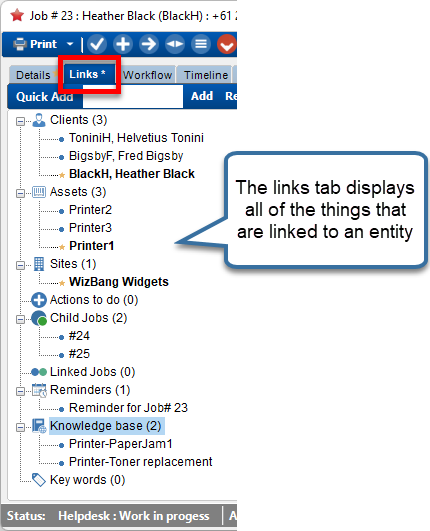
The Links tab
The links tab on a job displays all of the other things that are linked to it.
Linking Clients to a Job
Every Job must have at least one client linked to it before it can be saved. This client by default becomes the “primary” client for that job.
To do this:
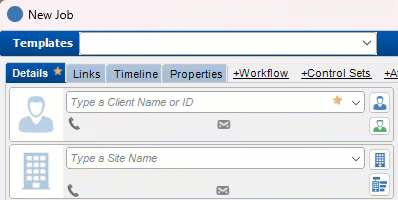
- Start typing into the client text box. Type a name, phone number, email address etc. Select from the filtered results
-
Click the Clients button to open the clients screen where you can perform a search for the desired client. When the job is actioned, the client ID that you have entered will be validated. If no such client exists, you will be prompted to re-enter the client ID. A client ID entered in this way will automatically be flagged as the “Primary Client”.
-
Link a client to a job from the Links
- Open the Job Details screen
- Click the Links tab
- Right-Click Clients
- Click Add
- Use the Search functions of the Clients screen to find the client you require
- Click Select
… or simply start typing details (name, phone, email, site) about the client and select from the list

Primary Clients
Further to each job requiring at least one client to be linked to it, each job also requires that one of these clients is marked as a primary client. If a job only has one client linked to it, that client automatically becomes the primary client.
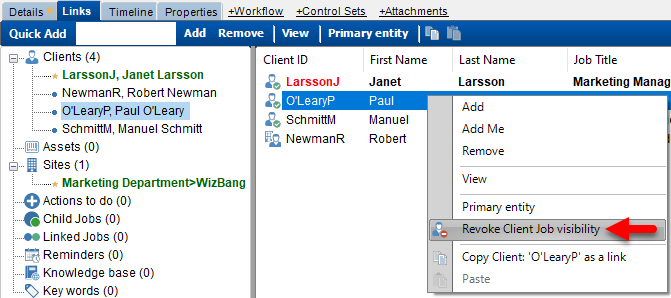
When multiple clients are linked to a job, to specify who is the primary client, click the Links tab, click the Clients option, select a client and then select Primary entity.
The Primary Client designation is simply a “tag” given to one of the linked clients to identify them as the main contact for the job. It is also used when sending email via the Action screen. The primary client has it’s own email checkbox so that email can be deliberately targeted to the primary client.
Granting / Revoking Client Job Visibility
By default, any client that is linked to a job has visibility via the web portal. This visibility status can be changed by right-clicking on a client from the Links tab, and then selecting the appropriate viewing permission.
Linking Assets to a job
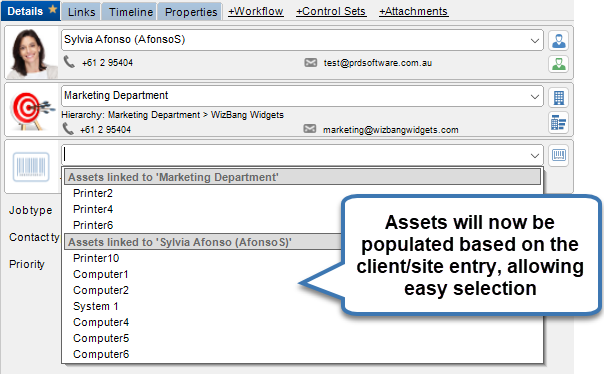
If the job template, used to log the job, has the Hide the Asset selector unselected (un-ticked), then when logging the job the asset selector will appear on the front screen. Assets may then be selected based on those already linked to the primary client or primary site via a pick-list.
To do this:
- Start typing part of the Asset ID into the asset text box, or from v24+ select from the pick-list results based on the client or site linked assets.
-
Click the Assets button to open the clients screen where you can perform a search for the desired asset. When the job is actioned, the Asset ID that you have entered will be validated. If no such asset exists, you will be prompted to re-enter the Asset ID. An Asset ID entered in this way will automatically be flagged as the “Primary Asset”.
-
Link an asset to a job from the Links;
- Open the Job Details screen
- Click the Links tab
- Right-Click Assets
- Click Add
- Use the Search functions of the Assets screen to find the asset you require
- Click Select
See also
Feedback
Was this page helpful?
Glad to hear it! Please tell us how we can improve.
Sorry to hear that. Please tell us how we can improve.