Application Security Role
Administration toolbar > Skillgroups / Security section > Application Security Role icon ![]()
Application security roles are used to control the level of access that staff have to the various screens and HelpMaster modules. Each staff member must belong to one and only one application security role. Although application security roles do contain some job related settings, the main mechanism for restricting job access and workflow is determined via a Job Security Role / Skillgroup combination.
The security system within HelpMaster allows the system administrator to define any number of application security roles to which staff members of HelpMaster are associated with. Each application security role includes details about whether a particular screen or function can be accessed.
Please note that the security settings do not apply to the system administrator. The administrator is able to use and modify any screen and access all system functionality.
Administration
Every staff member must belong to one Application Security Role. This can be done either via the Client screen > Staff tab, or via the Application Security Role screen.
Via the Client screen > Staff tab
- Open the client screen for the staff member you wish to administer
- Click on the Staff tab
- Select the appropriate Application Security Role from the drop-down box
- Click Apply or OK
Via the Application Security Role screen
- Open the Application Security Role screen by using the Administration menu > Application Security Roles toolbar button
- Use the search screen to find the Application Security Role you require
- Click on the Add button
- Use the Client search screen to find the staff member, and click Select
- Click Apply/OK on the Application Security Role screen
Settings Explanation
Name : The name of the security group. Must be unique
Staff Members tab
Use this tab to add or remove staff members from this role. Use the buttons at the bottom of the screen. Each staff member must belong to 1 (and only 1) Application Security Role.
HelpMaster modules tab
Email Manager administration: Allows access and full rights to the Email Manager and associated menus via the Desktop edition
Priority Manager administration: Allows access and full rights to the Priority Manager and associated menus via the Desktop edition
Web Portal Administration: Allows access and full rights to the Web Portal settings and associated menus via the Desktop edition
Active Directory Integration Administration: Allows access and full rights to the Active Directory administration and associated menus via the Desktop edition
Triggered Events Administration: Allows access and full rights to the Triggered Event feature and associated menus via the Desktop edition
Screen Access tab
Use this section to grant, deny or limit access to various screens and functionality within HelpMaster. Click on the screen/feature name to display a short description about the security settings and how it applies. A general guide is given below.
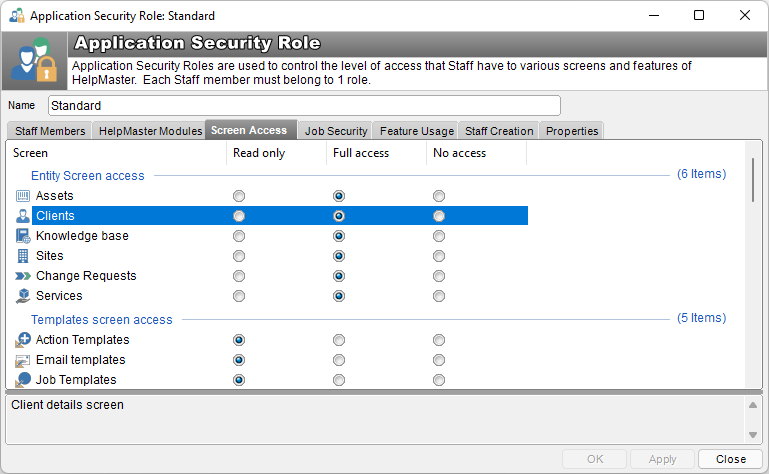
Entity screen access section
Assets: Refers to the Asset administration screen
Clients: Refers to the client administration screen
Knowledge base: Refers to the Knowledge base screen
Sites: Refers to the Sites screen
Change Requests: Refers to the Change Management screen
Services: Not yet implemented
Template screen access section
Action templates: Refers to the Action template screen
Email templates: Refers to the Email Templates screen
Job Templates: Refers to the Job Templates screen
Workflow Templates: Refers to the Workflow Templates screen
Change Request Templates: Refers to the Change Request templates screen
Other screen access section
Broadcast message: Refers to the Broadcast message screen
Message board: Refers to the Message board screen
Q Check: Refers to the Queue Check screen
View reports: Refers to the Reports screen
Deletion section
Purge/Delete Jobs, Actions and Changes: The ability to permanently delete these entity types via the Purge feature, or by using the Delete option on each entity.
Delete Entities: The ability to delete entities (Clients, Sites, Assets)
Delete Templates: The ability to delete templates (Job, Action, Email)
Administration screen access section
Issues: Refers to the Issues screen
Site Hierarchy: Refers to the Site Hierarchy screen
System codes: Refers to the System Codes screen
Template Manager: Refers to the Template Manager screen
Request Catalogs: Refers to the Request Catalogs screen
Billing Templates: Refers to the Billing Templates screen
Billing Manager: Refers to the Billing Manager screen
System administration screen access section
Attachments administration: Refers to the Attachments Administrationscreen
Custom fields: Refers to the Custom Fields Administration screen
Data Validation rules: Refers to the custom fields Data Validation screen
Import / Export: Refers to the Import / Export screen
Purge Jobs: Refers to the Purge Jobs wizard
System administration: Refers to the System Administration screen
Feature usage section
Action email options: Refers to the Email section of the Action screen
Change Actions Template: Refers to the ability to change an Action Template once one has already been set
Default templates: Refers to the user Default Templates screen
Template subscriptions: Refers to the Template subscriptions screen
Job Security tab
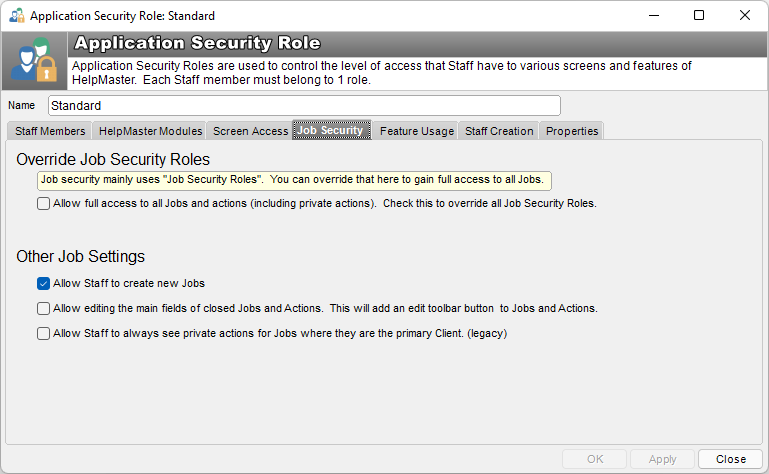
Overrides Job Security Roles section
- Allow full access to all jobs and actions: Checking this box grants administrator-like access to all jobs and actions and overrides any Job Security Roles that a staff member may belong to. By default, staff members usually only have access to jobs that are assigned to skillgroups that they are part of. Access to these jobs is governed by the Skillgroup/Job Security Role combination. This checkbox option can be used to override such configuration and grant a staff member to see and access all jobs regardless of which skillgroup (and job security role) they are assigned to.
Other Job Settings
-
Allow Staff to create new Jobs: Checking this box allows staff members assigned to this security group to log jobs.
-
Allow editing the main fields of closed Jobs and Actions (adds an edit toolbar button) Check this box to allow staff to perform a quick update of a closed job or action. When this setting is on, an additional toolbar button will appear on jobs and actions that will allow editing the job/action details textbox, while the job/action is still closed. This is a handy feature to use when updating/correcting text on jobs and actions without having to re-open them, edit them, and then re-close them (also affecting the action log dates / job close time / date last actioned etc..)
-
Allow staff to always see private actions for Jobs where they are the primary client. (legacy) This option is available since v22 of HelpMaster and was introduced to revert back to a legacy behaviour regarding private actions if that is desired. By default, any updates/actions to jobs that are marked as Private Internal Note, will only be visible to staff members that have access to the job (via Skillgroup access, or via a security override option). The end-user, or primary client (including Staff users) will not be able to see the private action details starting with HelpMaster v22.
Feature usage tab
General section
Allow Staff to update all custom SQL text boxes and Power Shell scripts. Use this feature with caution Checking this will allow staff to create and edit SQL statements and Powershell scripts throughout HelpMaster.
Use this SQL/Powershell feature with extreme caution. By default, this should be turned off, and only granted to administrative users of HelpMaster that know and understand SQL and Powershell.
Job/Action section
Allow Staff to change the “Actioned by” field of completed actions: Checking this will allow staff to change the Actioned by field for a completed action. This is useful to update incorrect action details.
Allow Staff to add global image exclusions from the attachments tab of Jobs and Actions: Allow staff to exclude images. See Excluding Images
Allow Workflow to be added when there is no current workflow on a job: Allows staff to add workflow to a job
- Allow Workflow to be changed, edited and removed: Allows staff to use, edit and work with workflow on a job
Undefined System Codes section
Settings that control the use of Undefined codes. See Undefined system codes
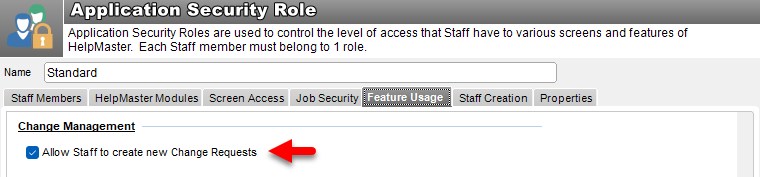
Change Management section
Allow Staff to create new Change Requests Allows staff to create new Change Requests
Reminders section
Viewing Reminders: Use the options in this group to control Reminder visibility
Staff / Client section
Allow Staff to change client passwords: Refers to the ability to reset client passwords
Allow Staff to merge duplicate Client/Staff records: Refers to the ability to merge clients
Allow Staff to create Staff members: Refers to the ability for staff to create other staff
Allow Staff to change Windows logon passwords: If checked, staff will be able to reset the Windows password for an Active Directory synchronized client. This requires Windows domain permission
Knowledge Base section
Allow staff to change Web enabled checkbox on knowledge base articles: Refers to the ability to be able to toggle the Is Web enabled checkbox on the knowledge base screen
Control Sets section
The checkboxes in this section controls access and functionality as labelled for each entity type
Messaging section
The option here control access and functionality as labelled
Billing section
Allow Staff to access the billing information on Actions: Refers to the ability to enter financial information on the Action screen
Allow Staff to manually override billing information for Actions: Refers to the ability to change billing information
Allow Staff to access billing formation and invoice Jobs: Refers to the ability to create an invoice from billable actions
Allow Staff to update and invoice billing information for closed Jobs and Actions: Refers to the ability to update and edit existing invoices
Allow Staff to delete invoices: Refers to the ability to delete invoices
Staff Creation tab
Allow Staff to create Staff members: Checking this will allow staff members to create other staff members. Once this is checked, select the appropriate roles that staff members with this access will be able to assign to new staff members
Properties tab
Description: A brief description of the security group
See also
Feedback
Was this page helpful?
Glad to hear it! Please tell us how we can improve.
Sorry to hear that. Please tell us how we can improve.