Google Workspace
Google Workspace integration can be used for sending and receiving email, maps integration and more. Before you can use a Google email account for sending email from HelpMaster, you must first configure your Google Cloud Platform (developer admin) and Workspace account settings. There are two methods for granting access via Gmail, a global Service Account for configuring Global Email Accounts in HelpMaster and personal OAuth 2.0 account access to an application. In both cases a Google App Project, Consent Screen, and Client ID / Secret first need to be created along with granting access to the Gmail API.
Creating the Google service account requires granting Domain Wide Delegation to the Gmail API, which grants the Google Service Account unlimited access (Send As, Read, Move, Delete, Impersonate etc…) to ALL user account mailboxes (Gmail) on the selected domain! There is no method for granular permissions control e.g. limiting access to only certain mailboxes or “Send Only” permissions and the like.
Google Service Account Settings
Step 1 - Create and configure your Google Service Account
- Open the Service accounts page
- Click CREATE PROJECT and enter a Project name (HelpMaster), select your Organisation, browse to your parent Location, and click Create
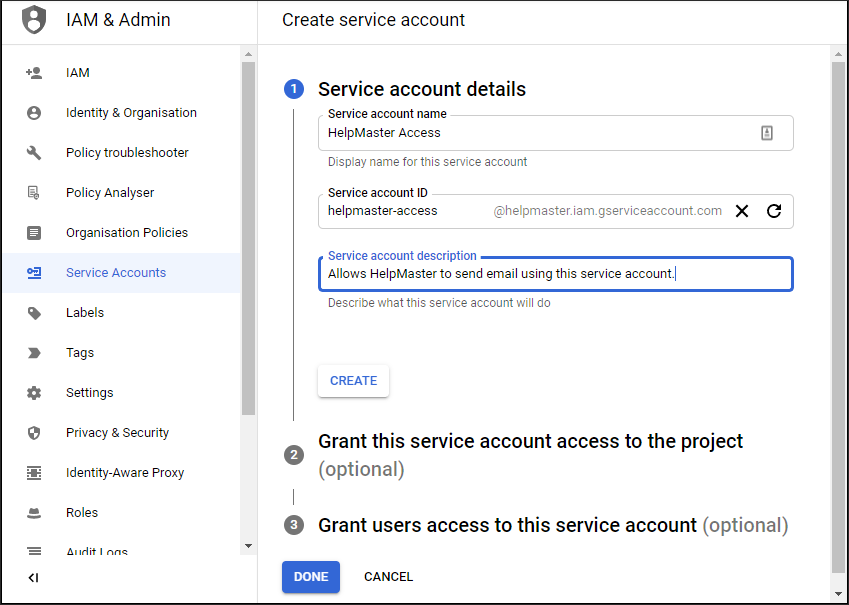
- Click + Create service account
- Under Service account details, type a Service account name, Service account ID, and Service account description, then click Create
- Optional: Grant this service account access to the project, select the IAM roles to grant to the service account, then click CREATE AND CONTINUE
- Optional: Grant user access to this service account, add the users or groups that are allowed to manage the service account
- Click Done to complete the creation of the service account.
Step 2 - Create your OAuth consent screen (application)
- Click Service Accounts from the navigation bar again and click on your new service account to Manage details of it
- From the Details (default) tab expand the Advanced settings by clicking the down arrow V. At the bottom click the CONFIGURE button
- From this OAuth consent screen choose the User Type - Internal followed by CREATE which will take you to the Edit app registration screen
- Enter an App name (e.g. HelpMaster Global), select the User support email and click the + ADD DOMAIN button
- Optional: Select an App logo and App domain details
- Add the Authorised domains that will suffix the email accounts you will be adding to HelpMaster, each domain must be added individually
- Add the Developer contact information email address and click the SAVE AND CONTINUE button
- On the Scopes page scroll to the bottom and click the SAVE AND CONTINUE button (Scopes don’t apply to Internal apps)
- A summary of your new OAuth consent screen will now be presented. Check the details and EDIT if necessary
Step 3 - Create a security Key for your new Google Service Account
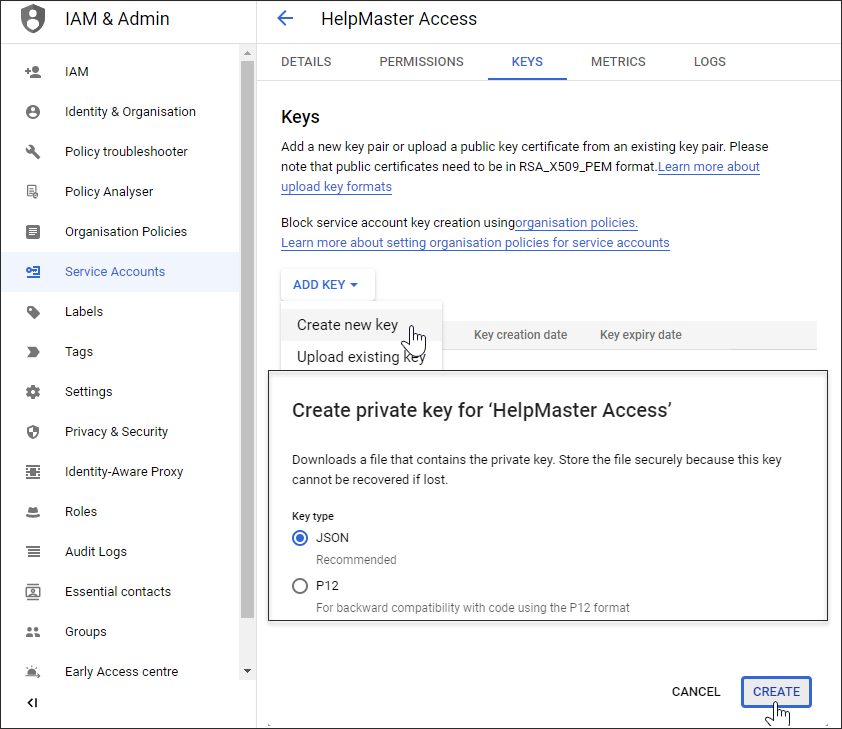
- Select the Keys tab followed by ADD KEY > Create new key
- Select the JSON key type followed by Create
- Save the key (JSON file) to a secure location
This will create the security key and bring up a download dialogue, download the key and save it somewhere secure as you will not have another opportunity to do so. If you do not copy or save this key you will need to create a new one. This key will be required to grant access from the HelpMaster System Integration settings screen.
Step 4 - Grant your new Google Service Account permissions to access email
- From your Workspace domain’s Admin console, go to Main menu > Security > Access and data control > API Controls
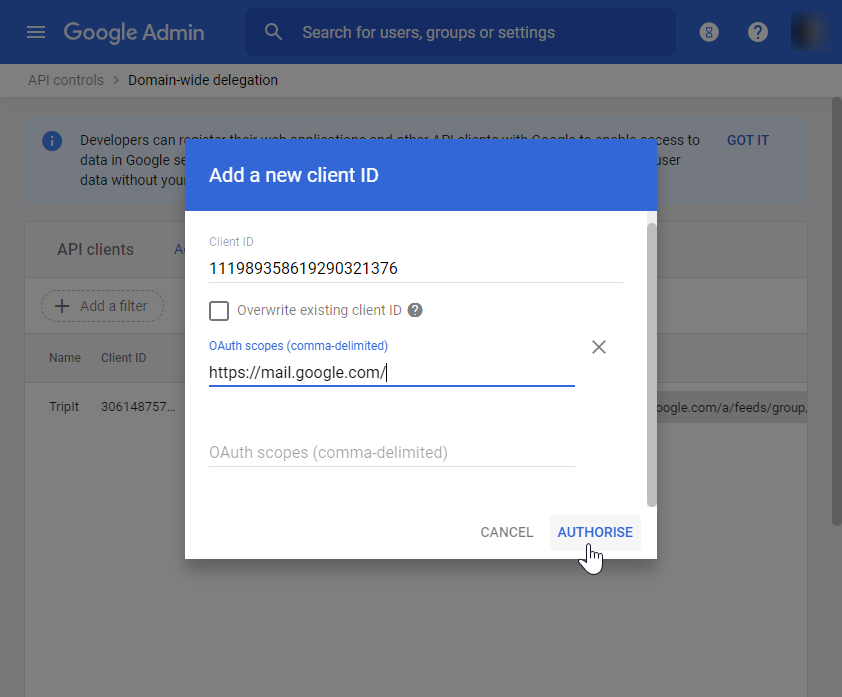
- Scroll to the bottom and in the Domain-wide delegation pane, select Manage Domain-Wide Delegation. Click Add new
- In the Client ID field, enter the service account’s Client ID. You can find your service account’s Client ID on the Service accounts page by clicking View Client ID. It is a 21 digit number
- In the OAuth scopes (comma-delimited) field, enter https://mail.google.com/
- Click Authorize
Step 5 - Add your new Google Service Account details to HelpMaster
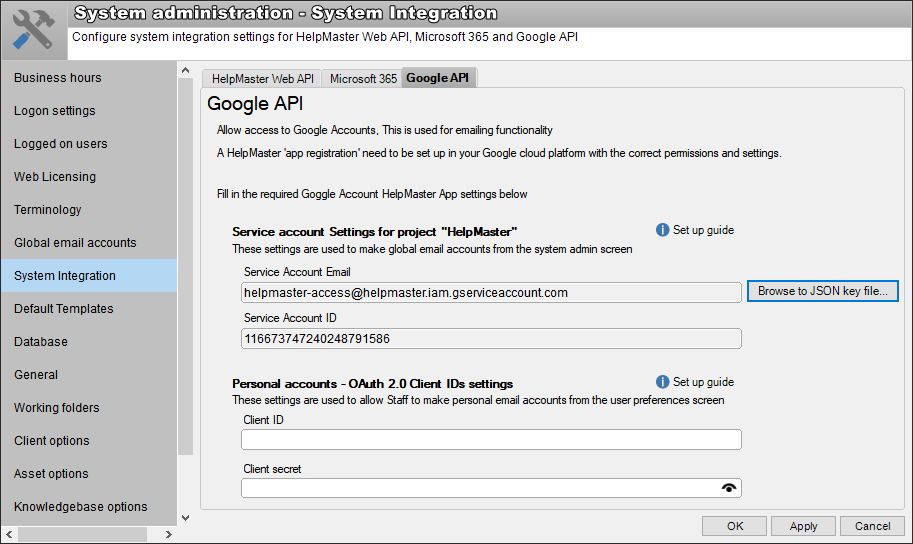
- Navigate to Administration > System Administration > System Integration
- Go to the Google API tab and click the Browse to JSON key file…
- Navigate to, and open the JSON key file that was created in step 3 above
- Click the Apply button to save the Google service account access details in HelpMaster
Once this step has been completed successfully, create or edit a HelpMaster Global email account that uses this Google API connection. See Global Email Accounts
Granting HelpMaster personal Gmail account access
Granting OAuth 2.0 access to the Gmail API does not require the above Google Service Account to be created first, however the same Google Project and Consent Screen / Application may be utilised. If you have already created the Service Account above you may skip steps 1 and 2 below and start at step 3 within the existing Google project you created.
With Internal User Type (Step 2.3 below) Granting OAuth 2.0 access to the Gmail API will also grant unlimited access (Send As, Read, Move, Delete etc…) to the user account mailbox (Gmail) being authenticated and any user on the selected Google domain will have access to this app via OAuth 2.0. There is a method for obtaining granular permissions control but it only applies to External user types and only after the app (project) has been verified by Google.
Step 1 - Create a New Project Resource
- Navigate to the Google Cloud Platform > Manage Resources > Manage resources screen
- Select the + Create Project option, enter a Project name, select a Location, and click the Create button
- Select your new project from the pop-up window.
Step 2 - Create an OAuth Consent Screen
- Navigate to the Google Cloud Platform > APIs & Services > OAuth consent screen screen
- Select your HelpMaster project created above
- Select the OAuth consent screen from the navigation pane. choose the User Type - Internal, followed by clicking the Create button
- Enter the consent screen details inc. App information, App domain, and Developer contact information. Click the SAVE AND CONTINUE button
- This will take you to the Scopes screen, as scopes do not apply to User Type - Internal, just click the SAVE AND CONTINUE button
- A summary of your new OAuth consent screen will now be presented. Check the details and EDIT if necessary
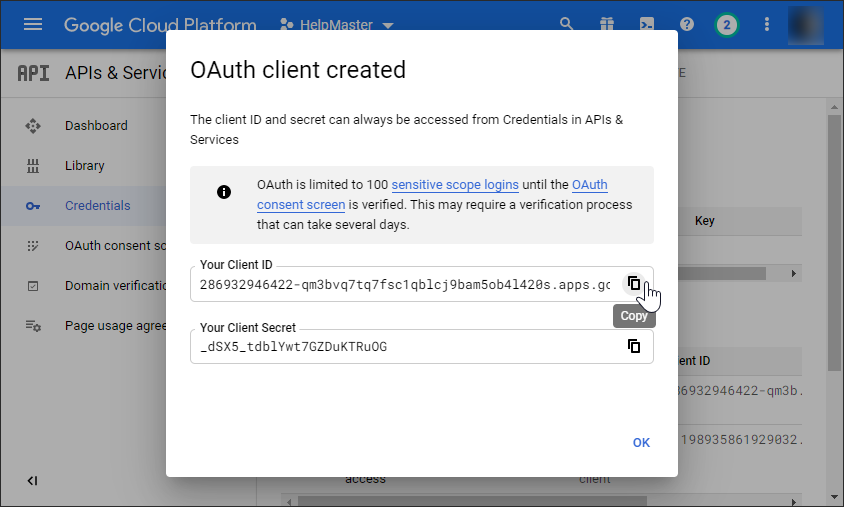
Step 3 - Create an OAuth 2.0 Client ID and Secret
- Navigate to the Google Cloud Platform > APIs & Services > Credentials screen
- Select your HelpMaster project created in step 1
- Click the + CREATE CREDENTIALS button and select the OAuth client ID option
- From the Application type field choose Desktop app and enter a descriptive Name e.g. “HelpMaster Gmail”
- Click the Create button and leave this screen open for copying to HelpMaster in the next step
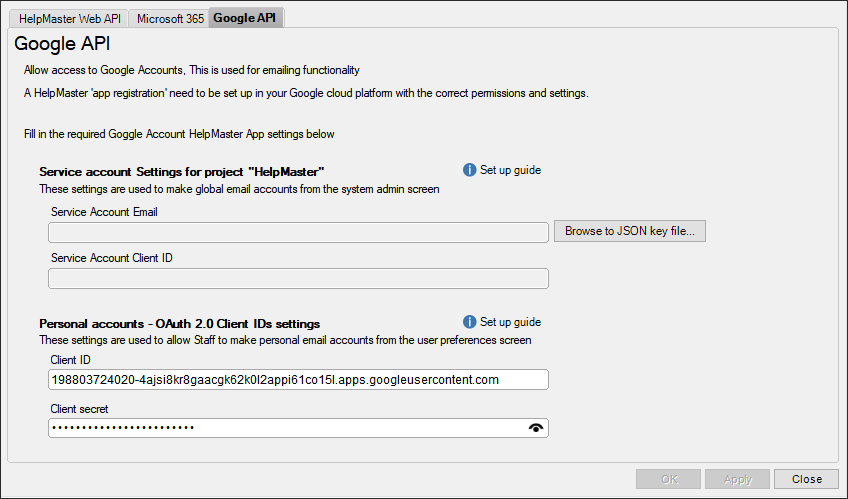
Step 4 - Add the OAuth 2.0 Client ID and Secret to HelpMaster
- Open the HelpMaster Desktop and navigate to Administration > System Administration > System Integration
- Go to the Google API tab
- Under Personal accounts - OAuth 2.0 Client IDs settings paste both Your Client ID and Your Client Secret into the matching HelpMaster fields
- Click the Apply button to save the Google service account access details in HelpMaster
- You may also download the JSON file and save it to a secure location
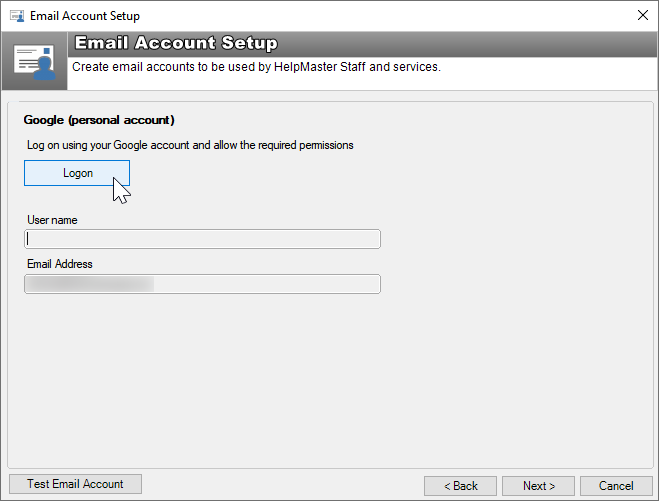
Step 5 - Create your HelpMaster personal email account
- From HelpMaster go to the HM menu and select My Preferences, go to the Email tab
- Click the Add Email Account button and select the Google (personal account) option. Click Next >
- Click the Logon button and sign in with your Gmail account credentials. Click the Allow button. This will return your Gmail account details to HelpMaster
- Click the Test Email Account button to test sending email from HelpMaster, click Next >
- Give your new account a descriptive friendly name e.g. “Gmail personal”. Click OK to finish
Removing HelpMaster personal Gmail account access
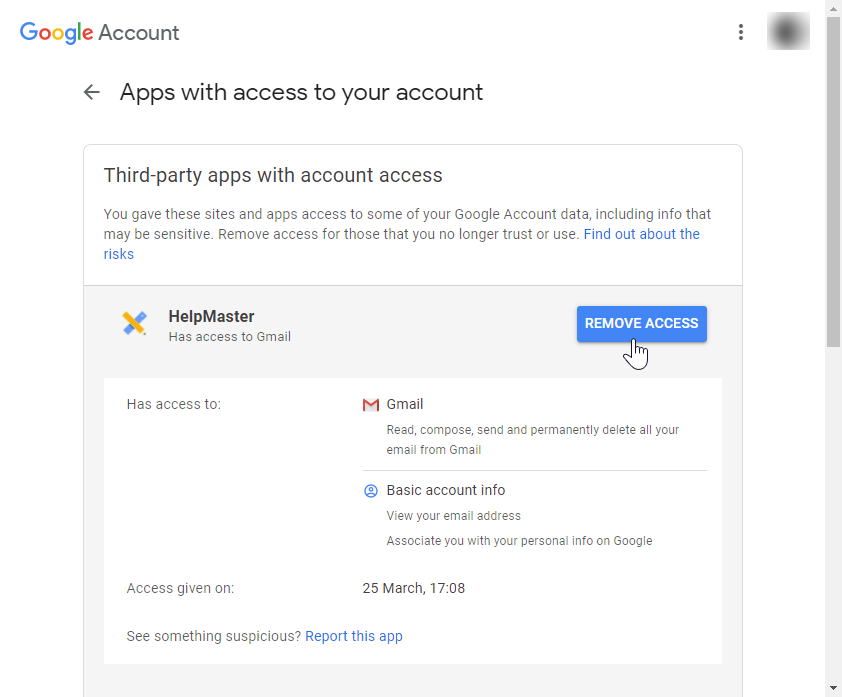
- Browse to your Gmail account from any compatible browser and click on your account avatar (image or initials) and click Manage your Google Account
- From the navigation bar click on Security
- Scroll down to the Third-party apps with account access pane and click on Manage third-party access
- Select the HelpMaster app and click the REMOVE ACCESS button.
See also
Using OAuth 2.0 to Access Google APIs
OAuth API App Verification Procedure
Feedback
Was this page helpful?
Glad to hear it! Please tell us how we can improve.
Sorry to hear that. Please tell us how we can improve.