Job overview
A job is the main business object within the HelpMaster that is used for ticketing, tracking and working with.
Depending on the configuration and the terminology the business uses, a job can become an Incident, a Problem, a Task, or anything else that you need to log, track and manage.
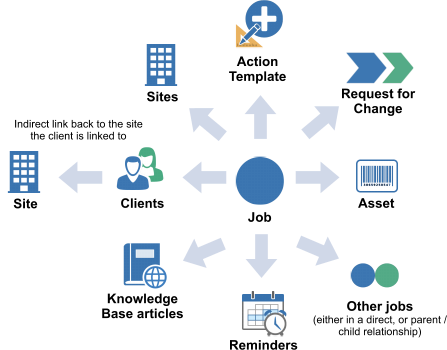
Each job has the ability to link to different entities such as clients, assets, knowledge base articles and even other jobs.
Think of a job as the thing that you create/log when you take a new service/helpdesk call. The way that is is classified, logged and assigned will determine how it is processed and eventually resolved. Common jobs are logged via Job Templates. Once a job is logged, Workflow can be utilized to ensure that a well-defined process is used to see the job through to completion.
Use the Classification viewer to classify jobs. This gives the job a specific classification which is useful to identify its nature. This code is also used heavily in searching, reporting and automation.
Prioritizing jobs is achieved by selected the appropriate priority code in the priority drop-down box. Priority codes are administered via the System Codes Administration screen. Priority codes can also be automatically set via automation via the Priority Manager, or built-in to job templates.
Assigning Jobs once a job is logged, or at anytime during its lifecycle is an important part of managing work. Jobs always have to be assigned to either a skillgroup, or an individual within a skillgroup. When a job is assigned to a group, it is referred to as being Unassigned to the skillgroup.
A job defines and stores all the information about the problem or issue that a client may have. A job is always associated with at least one client and can be linked to a site, assets, knowledge base articles, and even other jobs. Once a job has been logged for a client, all future updates (Actions) are recorded against the job.
A job has a natural life cycle that includes creation, modification, resolution and closure. A job is always Assigned to a either a technician (Staff member), or to a Skill Group to be worked upon.
What is the life-cycle of a job?
The job has a lifecycle that includes the following. Remember that you can create/configure the workflow of a job and its lifecycle to anything that your business operations require. The following is just a simple example. Use Workflow for process management.
- The job is logged
- The job is assigned to a staff member (helpdesk technician) for action
- The job is Actioned, that is, work is done for the job. The
- following actions may be performed to an active job
- Acknowledge job - Timestamps the job with a date when the job was acknowledged
- Re-assign this job to someone else. Can be either another staff member/agent, or another skillgroup
- Change the status of this job
- Add progress notes - Add general notes to the job
- Resolve and close
- Re-open job - Re-opens a closed job
- The job is closed.
Icons used throughout HelpMaster
| Icon | Object |
|---|---|
 |
Job |
 |
Job Template |
 |
Linked jobs - simple linking |
 |
Linked jobs - parent/child linking |
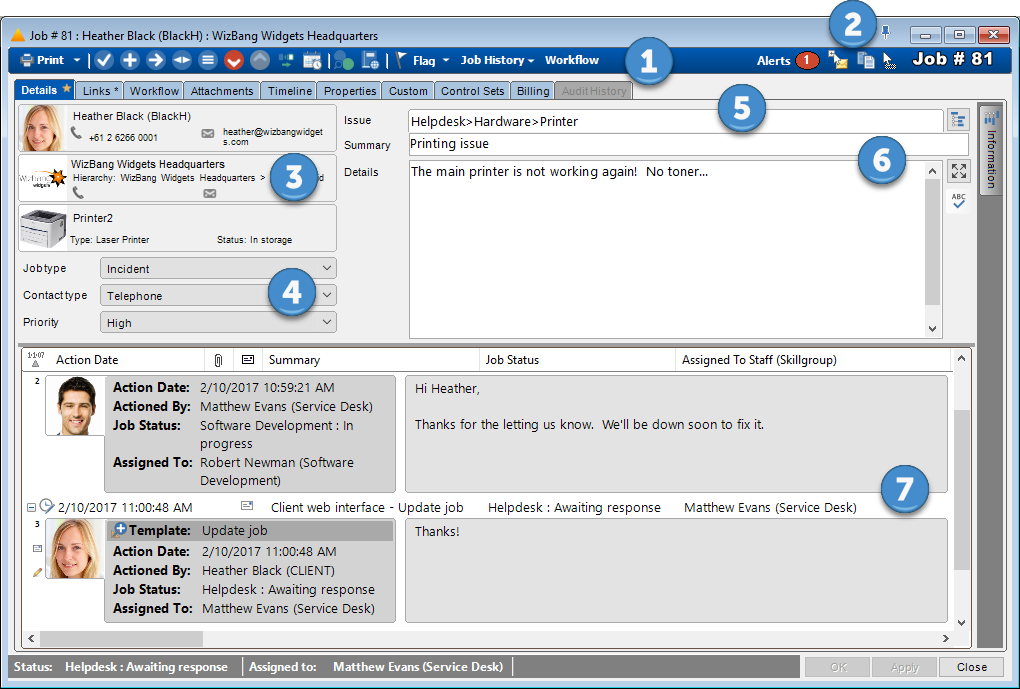
The Job screen
-
The job toolbar. Use these buttons to invoke the action screen, or perform other job-related tasks
-
Alerts, + Copy Job + Drag 'n drop support. Click the left icon to copy the job to the HelpMaster clipboard. Drag the right icon and drop it onto another entity to link this job to that entity

-
Clients, Sites and Asset links. This section displays the primary links for the job. Each job can have multiple people, places and things linked to it. The Links tab displays all of the links, whereas this section displays only the Primary entity for the job
-
Basic classification for the job. Contains:
- Job Type - A broad category to define what type of job this is. A mandatory field
- Contact Type - How the job was originated. A mandatory field
- Priority - An indicator of the urgency or non urgency of the matter. A mandatory field
-
Issue - The issue code is a mandatory classification of what type of job this is.
-
Job Details. Contains the following:
- Summary field - A one line summary of the job
- The details of the job. Can contain unlimited plain text.
-
The Action log. Contains information about each Action that is performed on this job. Actions can be sorted and grouped.
The Links tab
The links tab display all of the entities that are linked to the job. Multiple entities can be linked to the same job. Use the Quick Add text box, the Add button, or drag-n-drop entities into the links tab.
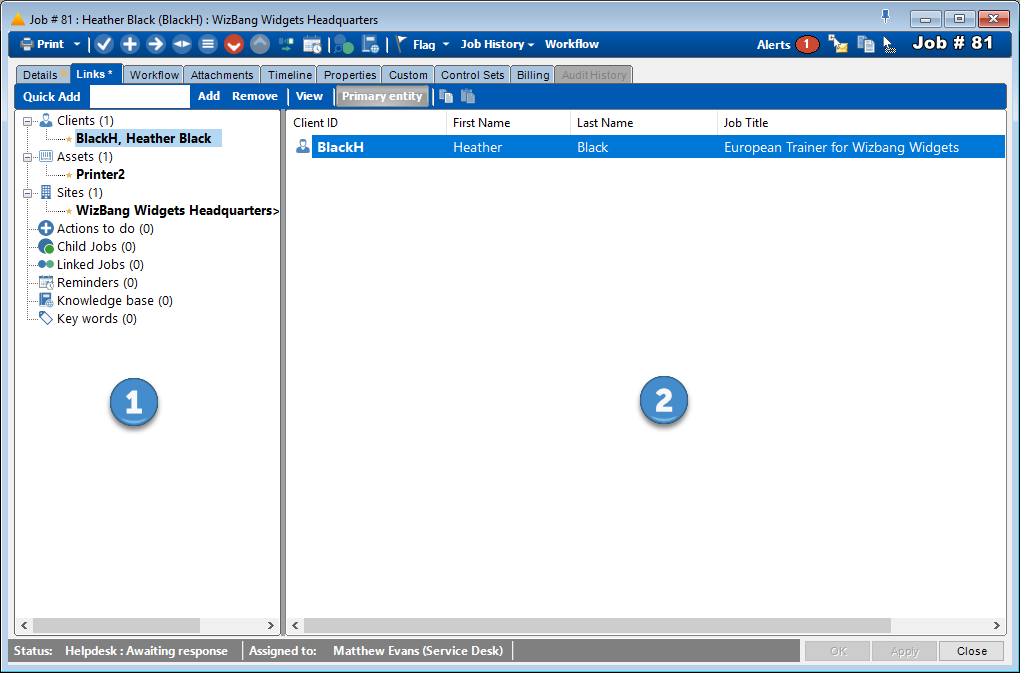
- The Links tab (see Linking entities). Use this panel to view the different types of entities linked to the job.
- The Entity list display information about the entity type you are currently browsing.
See Job Visibility for further information about linked clients.
Workflow tab
The workflow tab is used to create, use, or work-through any workflow/process that has been associated with the job. Workflow can be inherited from the Job Template that was used to create the job, or manually imported from a Workflow Template at any stage.
See Working with Workflow for further details about how this feature works with jobs.
Attachments tab
The attachments tab displays any file-based attachment that have been linked to the job. See Attachments for further details.
Timeline tab
The timeline tab displays date and time information about the job since it was logged. See the Job Timeline for further details.
Properties tab
The properties tab displays meta-data about the job, as well as some configuration options. This tab is useful for determining how the job was created, who, or what created it, and what job template (if any) was used.

Don’t purge: This checkbox is used to flag a job that should not be deleted/purged. By default, the Purge Wizard will not delete these jobs unless explicitly instructed to do so.
Private (Staff viewing only) When checked (ticked), the job will not be visible via the web portal to ANY clients. This includes the Primary Client unless they are a Staff member. This setting will override any other visibility options that may be set.
Hide Job Standard Actions When checked, the standard actions for the job will be hidden. This may be useful when using a custom set of “Available Actions” as defined in the Job Template.
Delete Job This option is only available to staff members that belong to an Application Security Role that has this option available. Clicking this button will permanently delete this job from the database. Check the Delete child jobs also to include any child jobs. All deletions are tracked via the System Event Log. Use with care!
Created by The Staff member/user that created the job.
Last modified by The Staff member/user that last updated the job.
Creation date The date the job was created.
Date last modified The date the job was last updated.
Product Type The HelpMaster product type that was used to create the job. This may be one of the following:
- Desktop
- Web Portal
- Email Manager
- Triggered Event
- WebAPI
- HelpMaster API
Job Template The job template that was used to create the job. If this is blank, it means that the job was manually logged by a user without using a job template.
Profile Refers to the automation profile that was used to log the job. This will only be filled in when the job was logged by one of the following:
- Email Manager
- Triggered Event
Control Sets tab
Displays any Control Sets that are linked to the job. See Control Sets
Custom tab
Displays any custom data that has been defined for the job entity type. See Custom data
Billing tab
Displays billing information for this job. See Billing Job Tab
Audit History tab
Display any audit logs for this job. See Audit History
See also
Concepts
Creating workflow and processes for business operations
Feedback
Was this page helpful?
Glad to hear it! Please tell us how we can improve.
Sorry to hear that. Please tell us how we can improve.