Web Portal settings
Once the HelpMaster Web Portal has been installed and is accessible via a browser, a number of additional settings need be set prior to use. Each of the settings outlined below are stored in the HelpMaster database.
Navigation in HelpMaster Desktop
Web toolbar > Web Portal section > Web Settings icon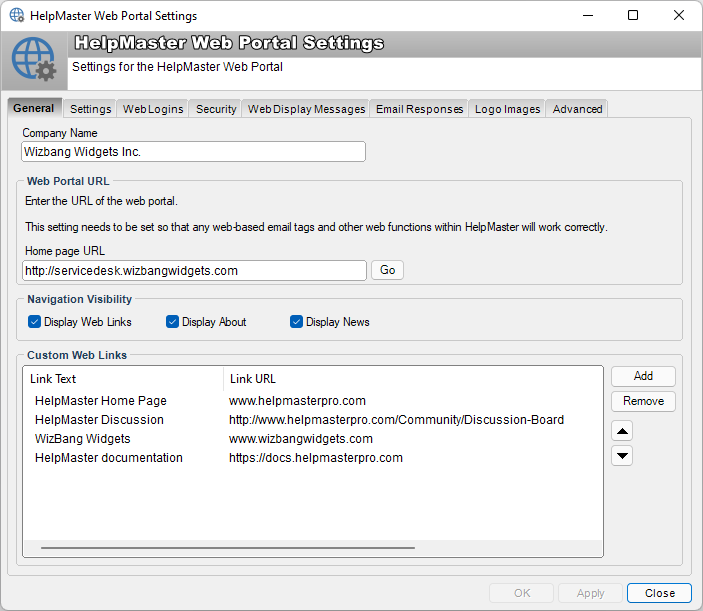
Use
Access the Web Portal settings as follows.
- Login to the HelpMaster Desktop edition
- From the Web menu, select the Web Settings toolbar button
- Click on each of the tab pages on the Web Portal Settings screen and configure the settings as desired
- Click the OK or Apply button to save your changes
Explanation of settings
General tab
Company Name: This text will appear on the title bar of every browser window that is displayed throughout the application.
Web portal URL: Set the Home page URL to the url that resolves to the logon page of your HelpMaster Web Portal. This settings is used by some EmailTemplatetags that point to your HelpMaster Web Portal, including the job feedback survey.
Navigation Visibility: These checkboxes control the visibility of some menus that can appear on the navigation bar of the Web Portal.
Custom Web Links: Create custom links to your web site or other resources. This will be displayed under Custom Links in the navigation bar.
Settings tab
Web Email Account: Select an email account which will be used for all emailing via the web portal. This email account cannot be a Microsoft Outlook account. The drop-down box will only populate with Internet style accounts, or Microsoft 365/Gmail accounts. See Email Accounts for further details.
Select an Action Template that will be used when Clients update their Jobs via the web portal: Optional. A default Action Template can be selected for Clients to update their job. Job status and notification emails to staff can be configured in this Action Template if desired. If not selected then a blank template will be used that only inserts the updated details without any other changes to the job.
Job Settings: Control Sets on the web are displayed in an accordion control that can either be collapsed, or expanded. Select the display option default for Control Sets.
Client Web - hide private actions rather than show a private action placeholder: When staff members mark an action (an update to a job) as Private, checking this option will remove the Action Log entry completely from view for Client users. If this option is not set, a private Action placeholder will be displayed but the details will be hidden.
Web Logins tab
Display an “Active Directory” login button on the login page: When checked, an “Active Directory” button will appear on the logon page that will allow staff and clients to logon via their Windows user account via a single-click login experience. This will only work for HelpMaster users/client that have been synchronized with Active Directory.
Always attempt an automatic Active Directory login: When checked, HelpMaster will attempt to log ALL users including both Staff and Client into the web portal via a Windows/Active Directory lookup. This option should only be enabled if all users of the web portal will be internal, domain users. This option is recommended, and useful where all users are internal. It is not recommended if servicing external (public Internet) Clients as they will be presented with a Windows authentication dialogue and may not be able to login at all. See Logon/off.
Allow logging in with Windows user name and password: When checked and the correct network credentials are entered, any Active Directory synchronized clients or staff can use their Windows username/password to log into HelpMaster instead of their HelpMaster username/password. See Logon/off.
Security Warning!
The Allow logging in with Windows user name and password selection is optional, but may present a security risk giving external users the ability to test if Active Directory user accounts are valid or not. If enabling this option make sure that your Active Directory Group Policy Account Lockout Policy is enabled to prevent brute force attacks.External Authentication Providers: Use this to configure external authentication providers such as Facebook, Twitter, LinkedIn, Gmail, Microsoft 365 etc… This feature is current under development. Please contact PRD Software if you would like to use this feature for now.
Security tab
Log in Security: This option allows the selection of the Number of failed attempts before lock out and the Lock out time in minutes to prevent brute force attacks.
The Allow Self Registration checkbox will allow clients to register themselves using the Register link on the web portal. They must provide basic details (name, email, password) to be able to logon and start using the Web Portal. As part of the registration process, HelpMaster will send a confirmation email to the supplied email address with an embedded link. The new user must click the embedded link to verify their email address and complete the registration process.
Attachments Security: This option is used to select file types that can be uploaded and downloaded as attachments to jobs and actions. There is also and option to Limit the allowed file size of attachments. All file attachments will be uploaded to the Attachments working folder
Web Display Messages tab
Logon Screen: This text will appear beside the Username / Password on the logon screen.
Home Page: This text will appear on the home page after logging in.
About Us: This pages text and images will appear when the About Us link in the navigation bar is clicked.
Contact Details: These contact details will also appear on the About Us page as above.
Email Responses tab
Reset Password: This is the email response that will be sent to the client if they initiate a password reset.
Account Confirmation: This email response will be sent to a new client after registering for a logon account.
Logo Images tab
Select logos to appear on the Web Portal. The small logo will appear in the navigation bar while the large logo will show on the logon screen.
Advanced tab
HTML header tags: Use this textbox to store any valid HTML script tags, or other HTML that you want to be injected into the HEAD area of each page within the Web Portal. This may be useful for custom plug-ins, tracking/analytics tools, or other scripts that serve a purpose. If using custom scripts, remember to adjust any CSP settings you may have configured in IIS, or they may be blocked by the browser.
See Also
Active Directory synchronization
Bulk-resetting client passwords for web use
Feedback
Was this page helpful?
Glad to hear it! Please tell us how we can improve.
Sorry to hear that. Please tell us how we can improve.