General preferences
HelpMaster is a highly configurable system. There are many user preferences that can be set to suit the individual needs and tastes of unique users. The user settings screen allows the currently logged in user to customize the look, feel and behaviour of HelpMaster to their liking.
All settings in this screen will only affect the user logged in - no-one else.
These settings are saved in the database, so they will follow a user if they log onto a different computer to use HelpMaster.
HM toolbar > My preferences icon 
Use
- Open the User preferences screen by using the HM menu > My preferences option
- Configure the settings as required
- Click on OK or Apply
Explanation of settings
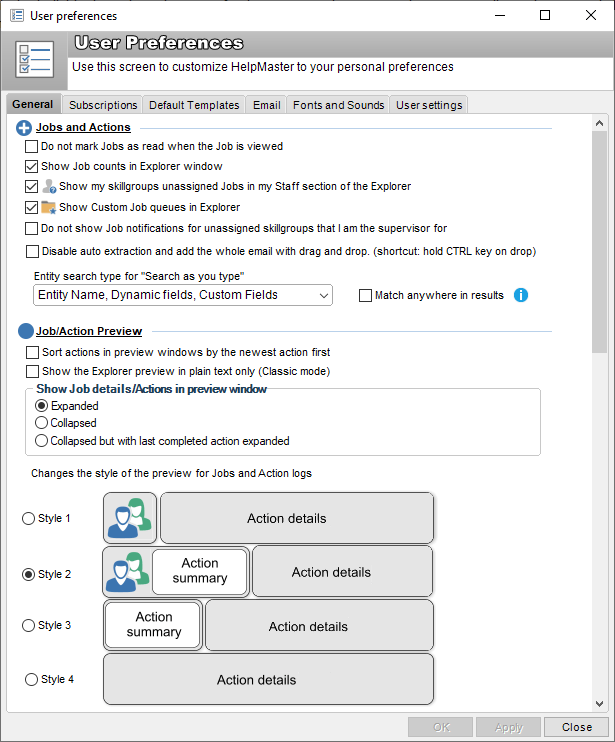
Jobs and Actions
-
Don’t mark jobs as read when the job is viewed : When unchecked, every time you view, or preview a job in the explorer, its read status will be set to read. This setting is similar to the way many email programs work.
-
Show job counts in explorer window : When checked, the count of jobs in each job queue and saved search will be displayed in brackets (34) after each queue. Checking this option incurs a performance penalty, as well as network traffic and database hits as the application needs to perform a the database calculation for each job queue. Turn this off if you are experiencing lag, or network congestion.
-
Show my skillgroups unassigned helpdesk jobs in my staff section of the explorer : When checked, the Unassigned section under My jobs will appear in Explorer.
-
Show Custom Job Queues in Explorer : When checked Custom JobQueues will appear in Explorer.
-
Do not show Job notifications for unassigned skillgroups that I am the supervisor for : When check this option will prevent job notifications from appearing for the skillgroup supervisor whenever a job in the unassigned skillgroup (that they are the supervisor) of is actioned.
-
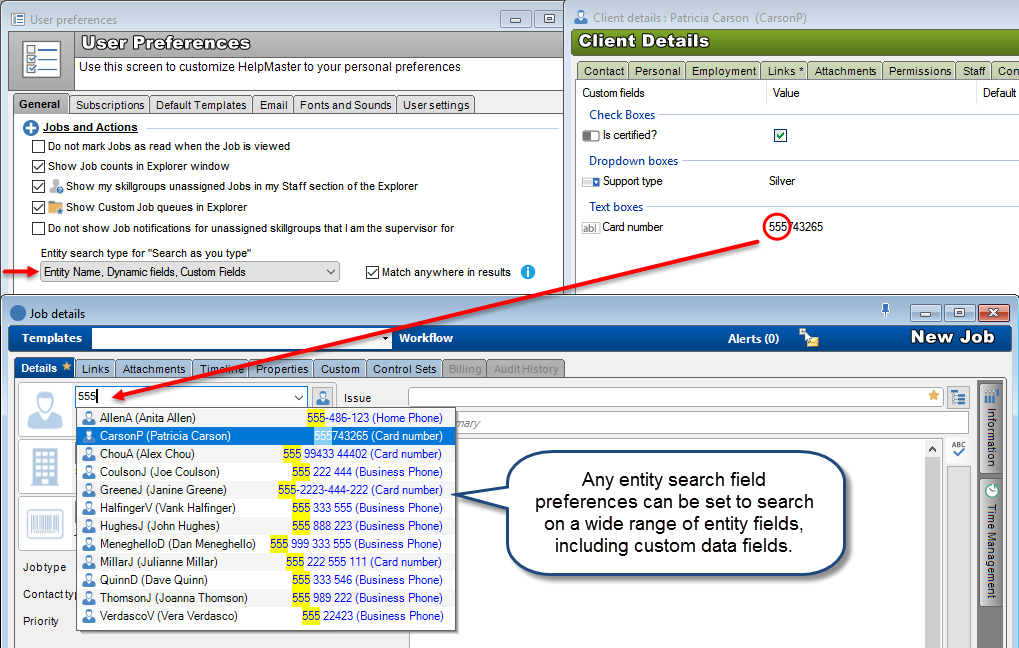
Entity search type for Search as you type : Select from the drop-down box which fields the quick-search text box will use when searching any entity including Clients, Sites, Assets and Knowledge Base articles.
-
Entity Name : Searches the Name field only of any entity including Client ID, First Name and Last name for Clients, Site name for Sites, Asset ID for Assets, Article ID, Title, and Keywords for Knowledge base articles.
-
Entity Name, Dynamic Fields : Searches Entity name fields above and additionally searches all entity dynamic fields (those of the four entities that can be defined under System Codes). This includes the Contact details frame of both the Client and Site Details screen > Contact tab, the drop-down selectable fields of the Asset Details screen > General tab. No additional Knowledge Base article fields are searched.
-
Entity Name, Dynamic Fields, Custom Fields : As above and additionally searches text only information contained on any entities Custom Fields tab.
-
Custom user defined search : Use this option to search on fields that are returned by the database stored procedure called stpJobClientSearch_UserDefined. This option allows a database administrator to create a custom search query using SQL. Note that the format of the SQL should follow the design pattern of the original version of the stored procedure. The names of the fields that are returned by the SQL must remain the same, however the way their values are retrieved can vary to suit your requirements. Please contact PRD Software for further information about this.
Job / Action preview
-
Sort actions in preview windows by the newest action first : When checked, will sort the text and action log by a descending date order. Good if you like to read what happened last, first.
-
Show the Explorer preview in plain text only (Classic mode) : When checked, the Preview panel of the Explorer screen will show the job and action log details in plain text. This is similar to the way previous versions of HelpMaster worked.
-
Show Job details / Actions in preview window : Use the options here to to adjust how action log entries are displayed
-
Action log display style : Choose from 3 different stylings of the action log.
General
-
Show Tip of the day on startup : When checked, will display the tip of the day screen every time you start HelpMaster for the first time. This setting can also be set via the Tip of the Day screen.
-
Categorize Quick Launch items : Changes the way the Quick Launch items are displayed in the menu. They can be grouped either by their category eg. All general applications, or Graphic files or, alphabetically regardless of what category the item belongs to.
-
Use Auto text when editing text : When checked, the AutoText feature will be active when typing into any multi-line text box throughout HelpMaster. This is especially helpful when entering job details when logging a job, or performing an action.
-
Sort order for user-defined custom fields on Custom tab : Sets the default sort/display settings for custom fields on the custom tabs. When actually viewing custom details, this setting can be manually over-ridden.
-
Automatically list all entities when search screens are displayed: Usually when the user clicks on an entity button (client, site, asset, knowledge base) from the toolbar, the filter/selector screen is displayed. From here the user can enter some search criteria and press the Search button to perform the search. If this user preference checkbox is checked, these screens will automatically perform the search, using no search criteria, in effect displaying all of the available entities. This is similar to the way HelpMaster v5 performed and may be useful if you have a small number of entities. If you have many entities, you may wish to leave this option unchecked so that you have the chance to provide some filter criteria before manually clicking the Search button.
-
Show main keyboard shortcuts in status bar : Checking this will display a status bar along the bottom of the screen that displays some of the common shortcut keys for HelpMaster. Use this setting if you are new to HelpMaster, or just need a reminder about some of the function keys.
-
User-defined boolean displayed as : One of the custom data data types is the Boolean datatype. Select from the drop-down box your personal display choice.
-
Prompt user to confirm when exiting HelpMaster : When checked, a confirmation message will appear whenever HelpMaster is shut down. This is a useful setting for times when you accidentally click the X in the top-right corner of the window, thinking that it is another window, only to find that you have closed the main HelpMaster application. Also good for terminal sessions such as Citrix when shutting down and re-starting HelpMaster takes some time.
-
Disable grouping in listview when sorting : When unchecked, all list displays will not be grouped by the column that is being sorted.
-
Show the standard toolbar on the main window (rather than the ribbon control): Use to set your preference for navigation control. Traditional menus, or Ribbon
-
Disable email auto extraction: When dragging and dropping an email from Outlook onto a job, HelpMaster can automatically attempt to extract only the reply portion of the email, and discard the signature block and everything below that. Use this setting to change this behaviour. If auto-extract is turned on, holding down the CTRL key when dragging and dropping an email will provide an over-ride and the entire email will added.
Advanced
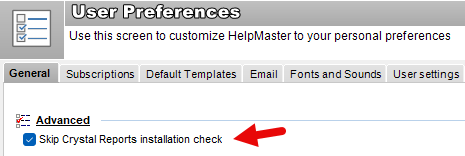
- Skip Crystal Reports installation check. When HelpMaster first starts, it will perform a Crystal Report version check and also pre-load the Crystal Reports runtime libraries in the background. This is done to save time when running reports later. Check this box to disable this operation. Checking this option may also help to fix issues with not being able to run reports due to Crystal Reports mis-matches in versions, or if multiple versions of the Crystal Reports runtime files are installed on a machine.
-
Export separator. Enter a custom field delimiter when exporting fields via any of the list entity screens.
-
Form resize painting. Adjust the slider to configure how HelpMaster re-sizes screens. This may help reduce screen flicker, and lag.
HelpMaster Application Display Mode
Choose your screen preference for HelpMaster
All-in-one: The default setting displays all screens of HelpMaster within a parent window. Individual windows can still be un-docked from the parent by clicking the small pin icon in the form title bar.
Individual Screens: This mode allows you to have HelpMaster screens completely separate and floating. Good for multiple monitors.
Log File
- Log application errors to : Should an unexpected error occur when using HelpMaster, an error log will be created and written to the location that you specify in this setting. This log can then be sent to PRD Software, or your HelpMaster administrator for analysis.
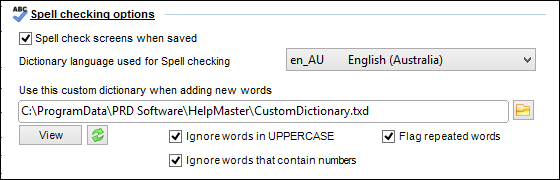
Spell checking options
HelpMaster features spelling checker for all text controls within the application. Major text controls such as the job and action details screen will highlight misspelt words by underlining them with red squiggly lines. Other text controls can be spell-checked by right-clicking within the control and selecting Check spelling.
-
Spell check screens when saved : When checked, HelpMaster will use the Microsoft Word (if installed) dictionary to spell-check all text boxes whenever a screen is saved.
-
Dictionary: Select a dictionary to use for spell checking.
-
Custom dictionary: Save custom dictionary files either in a local, or networked location.
Themes
- Select a visual theme to use with HelpMaster : Select a theme from the drop-down box.
Language
Select the language to use HelpMaster in : Currently HelpMaster only supports English. Future versions may provide additional language support.
See also
Feedback
Was this page helpful?
Glad to hear it! Please tell us how we can improve.
Sorry to hear that. Please tell us how we can improve.