Update an existing job from an incoming email
A powerful feature of the Email Manager is its ability to update an existing job with the contents of an incoming email that’s related to that job.
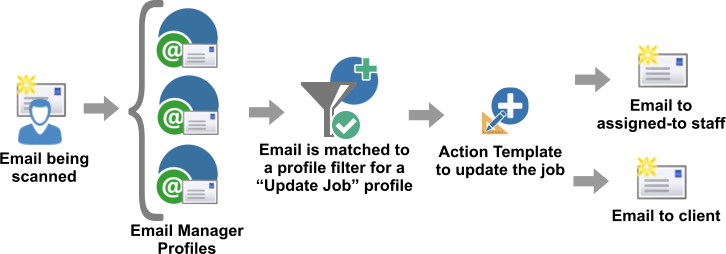
By default, the Email Manager will only update jobs if the incoming email belongs to one of the clients linked in the job, however configuration options can override this.
All updates to existing jobs are performed by applying the contents of an Action Template. This ability allows you to implement a high level of email management automation at your workplace. In effect, you can send email to your clients - they can respond to it - and the Email Manager will automatically scan the email and update the appropriate job. Furthermore, because an Action Template has the ability to send email, your client can also receive further email relevant to their issue.
In order to do be able to apply an action template to an existing job, the following conditions must be met.
- The incoming email must contain the job number somewhere in the subject field. This is how the Email Manager knows which job to update.
- The incoming email must contain a phrase, or word that immediately precedes the job number. This is how the Email Manager can recognize where the job number appears within the subject of the email
- The job number that is contained in the incoming email must be a valid HelpMaster job
- The sender of the email must be a person that is either the Primary Client of the job, or linked to the job as an additional client. This rule can be over-ridden to allow all updates - contact PRD Software for details.
Use
- In the Email Manager Profiles Administration screen, click New.
- Click Add to select a Mailbox folder to scan.
- Choose the Mailbox folder this profile will scan, and click Select.
- Click Next to go to the next step, Specify Filter Criteria.
- Follow the procedure below.
Explanation of each step
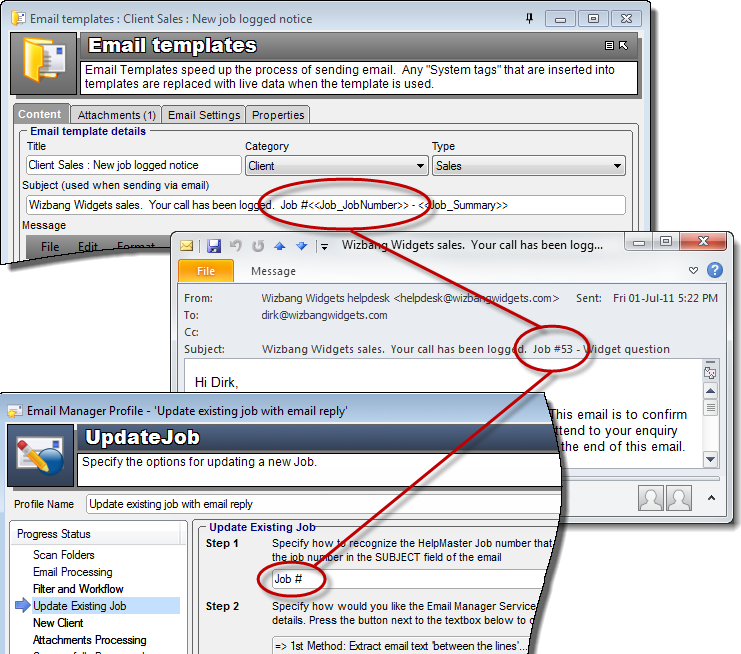
Step 1 : Specify how to recognize the HelpMaster Job number that the action will be added to
Before the Email Manager can update an existing job by applying an Action Template to it, it needs to determine which job the incoming email is associated with. The way the Email Manager does this is by scanning the subject field of the incoming email for a valid job number. It recognizes the job number by looking for specific text that will appear directly before the job number. Once it finds this text within the subject of an email, it will assume that any numeric text following it will be the job number. As a general best-practice, it is common to include the job number in every out-going email that your workplace sends. Not only will this allow you to use the Email Manager to update a job, but it also gives your clients their personal job number for future reference. HelpMaster makes this easy via the use of Email templates Tags.
The screens shots below depict how this is achieved. For further information on this, refer to Email Manager Tips and Tricks
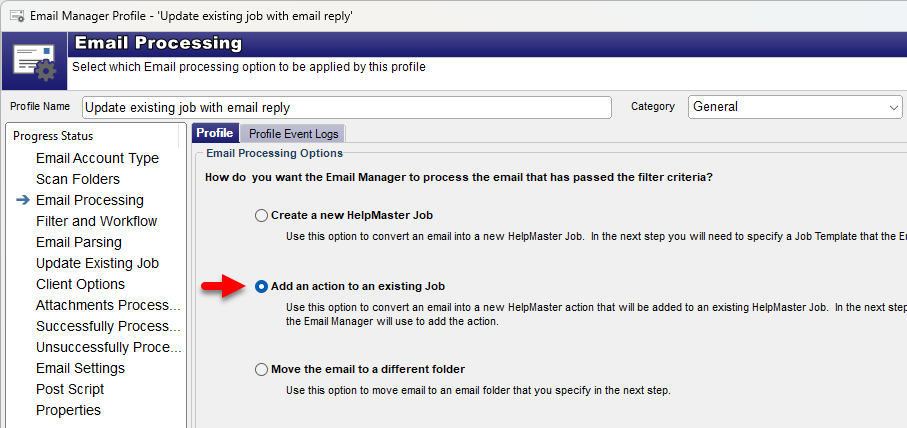
Step 2 : Specify the HelpMaster “Action Template” that will be used to update the job Choose from the list the Action Template that you wish to use to update the job. Note : this list will only be populated with “Email Manager Publicly available” action templates. Remember that an Action Template also has the ability to send email once it has been applied. This is useful if you wish to send an email back to your client informing them that their job has just been updated.
Step 3 : Specify which part of the email to add to the action details (This step is optional)
When the Email Manger updates an existing HelpMaster job with an Action Template, by default it will include the entire email message as part of the Action details. In many cases, this may be undesirable due to the fact that email messages can quickly become quite long after several exchanges between sender and receiver. When you update a job, you may only want to include the most recent comment from your client.
Refer to Text Extraction options for details about how the Email Manager can extract replies from incoming email.
In order to achieve this type of functionality, you will need to ensure that your out-going email to clients contain both the top and bottom words within the outgoing email. The easiest way to do this is to base all out-going email on a Email Template that contains these lines.
- Specify the Attachment options
- Specify the Post Processing options
- Specify the Email Account for any outgoing email
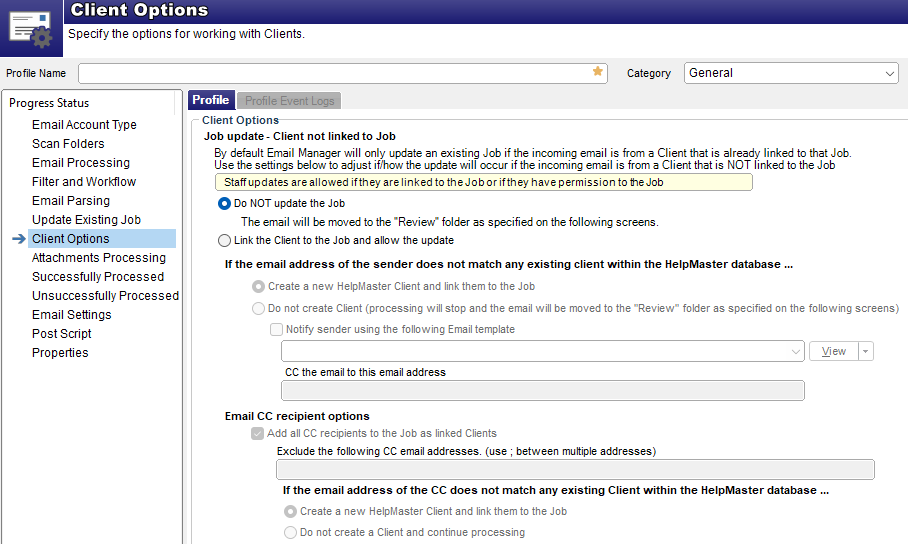
Client Options
When updating an existing job, the Client options screen has a different set of configuration options from logging a new job.
By default, the Email Manager will only update an existing job with an incoming email, if the email is from a client that is already linked to the job. This ensures that privacy and viewing permission is maintained. An exception to this rule is if a staff member is the sender for the email, and they would naturally have viewing/editing permission to the job anyway via their Skillgroup / Job Role settings.
Use this screen to change the defaults to configure the behaviour of how jobs and/or clients are processed for updates.
See Also
Creating a profile to log a new job
Feedback
Was this page helpful?
Glad to hear it! Please tell us how we can improve.
Sorry to hear that. Please tell us how we can improve.