User / Authentication API
Endpoints
POST - /user/getsystemtoken
POST - /user/gettoken
Overview
The User endpoint is the entry-point into using the HelpMaster WebAPI. This step must be performed before ANY other WebAPI call is made. The User function authenticates the WebAPI session and allows further access to other API endpoints once a bearer token has been issued.
Before the USER endpoint can be used to get a web token (which is then used to call other end-points in the HelpMaster WebAPI), a valid WebAPI key must have already been created via the HelpMaster desktop edition via the API Integration screen.
Simplified 3-step process to use the WebAPI

Step 1
Generate a HelpMaster WebAPI key via HelpMaster Desktop edition, via the Web API Integration screen

Steps 2 and 3
Once you have a WebAPI key, the following diagram displays the sequence flow for Steps 2 & 3 for using the API.
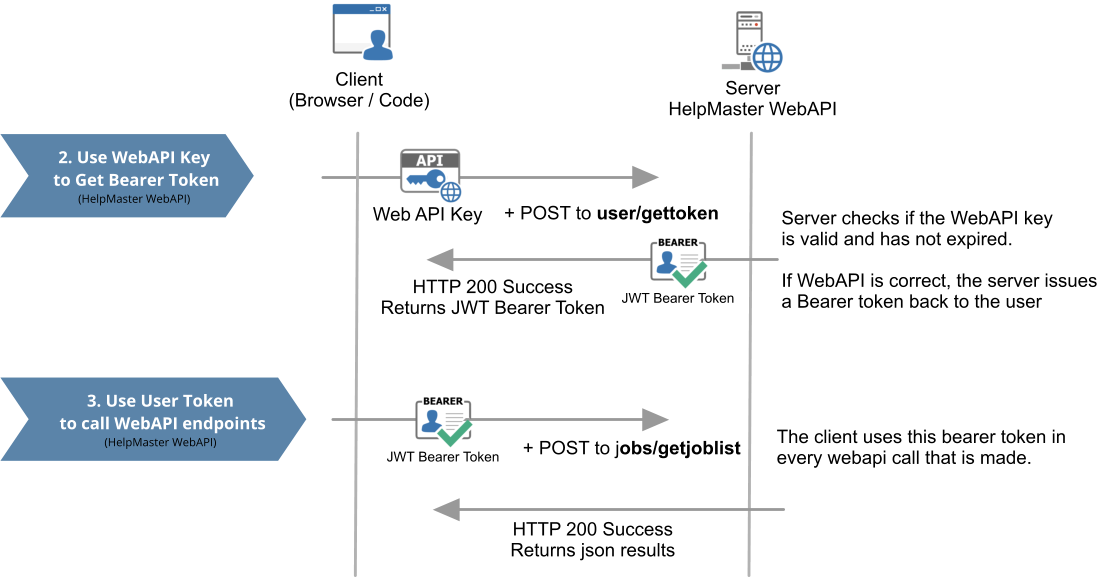
GetSystemToken endpoint
The GetSystemToken endpoint is used to generate a bearer token that is required when making calls to all other WebAPI endpoints. When this endpoint is used, all subsequent WebAPI calls will be used under the context of the HelpMaster System user account. This is a built-in account that is used by automation events and processes, such as the Email Manager, Priority Manger, Trigger Events and OnCreate Workflow events.
The bearer token will be valid for the time specified for the API key that was used to make the token. The options are to expire within 24 hours, or no-expiry.
GetToken endpoint
The GetToken endpoint is used to generate a bearer token that is required when making calls to all other WebAPI endpoints. When this endpoint is used, you will also need to supply a loggedInUserPKID parameter that corresponds to a valid Staff member’s PKID which will then be used for all subsequent WebAPI calls.
The bearer token will be valid for the time specified for the API key that was used to make the token. The options are to expire within 24 hours, or no-expiry.
Using the Swagger interface
- Create a Web API key if you haven’t already
- Copy the key into the computer clipboard
- Browse to your WebAPI Swagger interface
- Navigate to the /User/GetToken/ section and click the Try it out button. The text box will become active, and you will be able to type/paste information into it
- Paste the API key into the apiKey value section
- Set the loggedInUserPKID to a valid client PKID in HelpMaster database
The GetToken screen should look similar to this:
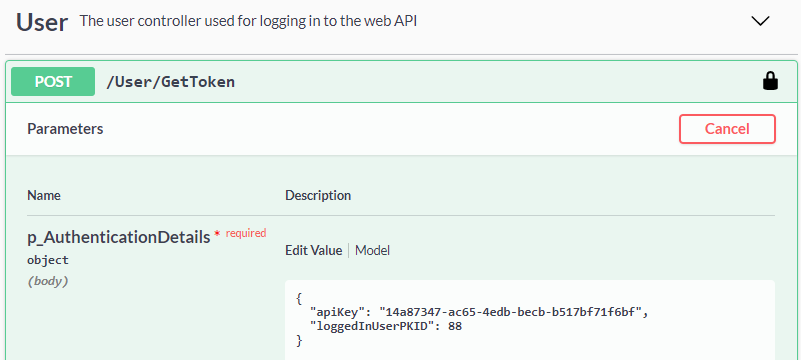
{
 "apiKey": "0bef4ace-0826-4be7-81ad-7bd7e8bfbc5f",
 "loggedInUserPKID": 88
}- Click Execute. If the token is valid, you should see a value returned in the Success 200 section like this…
{
 "token": "eyJhbGciOiJIUzI1NiIsInR5cCI6IkpXVCJ9.eyJqdGkiOiI4MTM5MDBiMy1iZjE2LTRmY2EtYTJkZi0wNjA1MjE1NDc4MmQiLCJ2YWxpZCI6IjEiLCJ1c2VyaWQiOiI4OCIsIm5hbWUiOiJIZWxwTWFzdGVyIFdlYkFQSSBLZXkgLSBEZXZlbG9wZsdgS2V5ICMxIiwiQVBJUEtJRCI6IjEiLCJBUElLZXkiOiI4NDM1ZDc3MC05MDVmLTQ5ZjAtOWExMy04ZTUxYWZiOGQwNTQiLCJleHAiOjE2MjI1NDg2NDcsImlzcyI6Imh0dHA6Ly9oZWxwbWFzdGVycHJvLmNvbSIsImF1ZCI6Imh0dHA6Ly9oZWxwbWFzdGVycHJvLmNvbSJ9.BgPc7A0-zuOqsoLORsVAIgN4ry5LGhc2O9c_jX-DIKc"
}- Copy the token results (excluding the word “token:” and excluding the quotes around the token) from the Response body results in the 200 code section:
eyJhbGciOiJIUzI1NiIsInR5cCI6IkpXVCJ9.eyJqdGkiOiI4MTM5MDBiMy1iZjE2LTRmY2EtYTJkZi0wNjA1MjE1NDc4MmQiLCJ2YWxpZCI6IjEiLCJ1c2VyaWQiOiI4OCIsIm5hbWUiOiJIZWxwTWFzdGVyIFdlYkFQSSBLZXkgLSBEZXZlbG9wZsdgS2V5ICMxIiwiQVBJUEtJRCI6IjEiLCJBUElLZXkiOiI4NDM1ZDc3MC05MDVmLTQ5ZjAtOWExMy04ZTUxYWZiOGQwNTQiLCJleHAiOjE2MjI1NDg2NDcsImlzcyI6Imh0dHA6Ly9oZWxwbWFzdGVycHJvLmNvbSIsImF1ZCI6Imh0dHA6Ly9oZWxwbWFzdGVycHJvLmNvbSJ9.BgPc7A0-zuOqsoLORsVAIgN4ry5LGhc2O9c_jX-DIKcScroll to the top of the Swagger page, and click the Authorize button and paste the value into the text box and click Authorize.
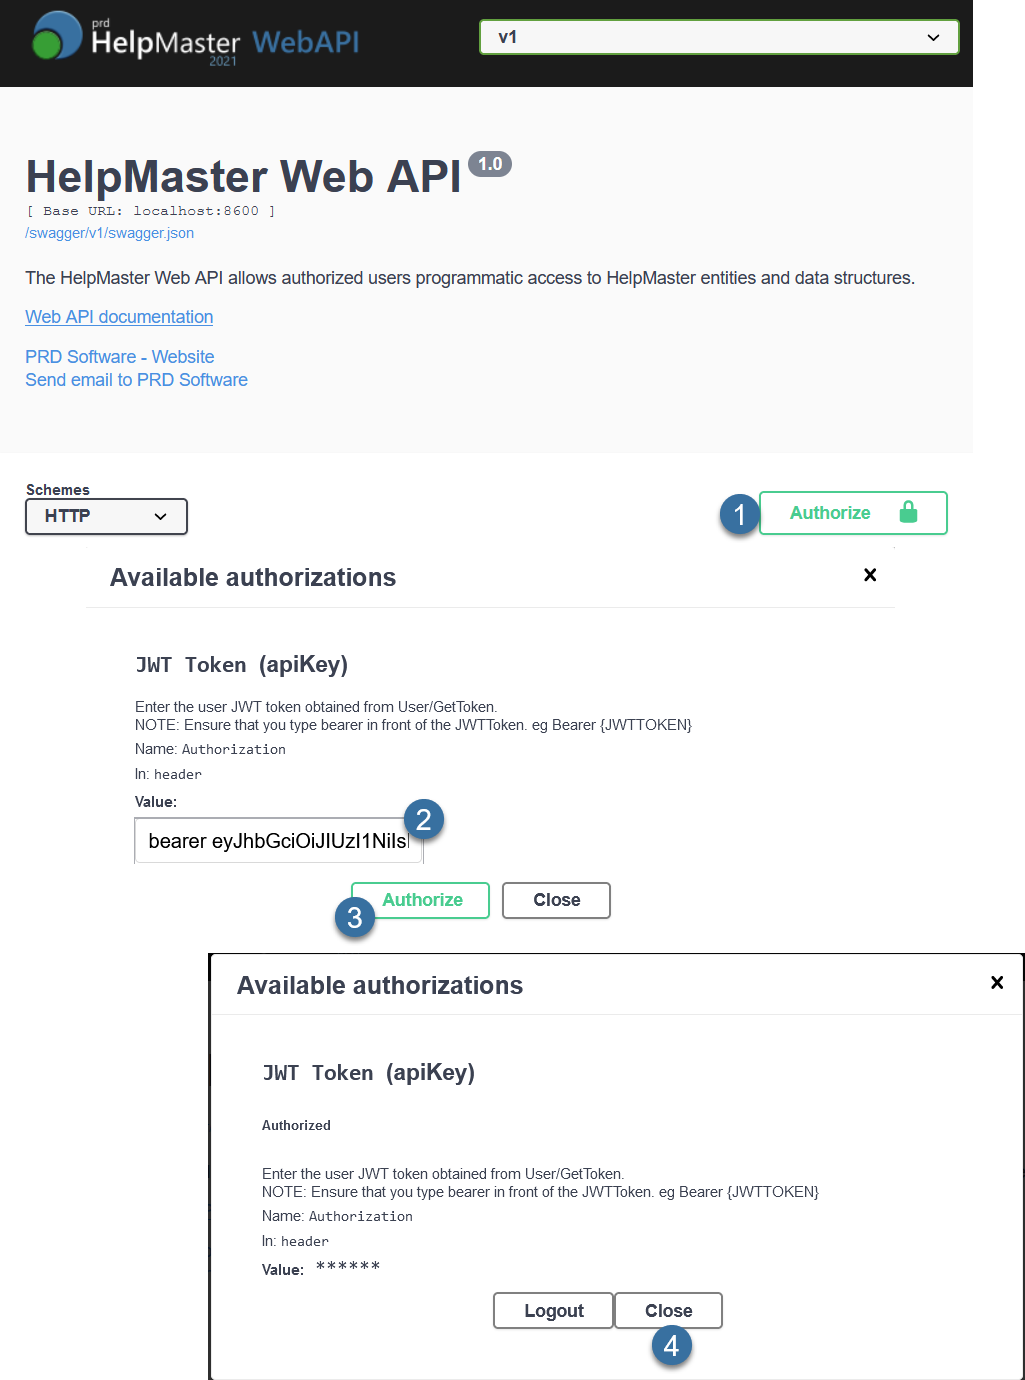
If everything is successful, the JWT/API token will be generated and you will be able to start making calls against all web API endpoints.
Click the Close button (not the Logout!)
See also
API Integration (HelpMaster/Microsoft/Google)
Swagger Authentication « External site link
Feedback
Was this page helpful?
Glad to hear it! Please tell us how we can improve.
Sorry to hear that. Please tell us how we can improve.