Importing XML Format
HelpMaster can only import from an XML file structure. CSV, or other structures or file formats are not supported (although conversion options are available - see below)
There are 2 styles of XML that can be used. The first structure can be generated directly from an SQL Server 2005 (or greater) table as follows:
SQL RAW XML SAMPLE
Schema example:
<Import_Records>
    <row Field1="value" Field2="value" Field3="value" Field4="value" />
    <row Field1="value" Field2="value" Field3="value" Field4="value" />
    <row Field1="value" Field2="value" Field3="value" Field4="value" />
</Import_Records>
With data example:
<Import_Records>
    <row ClientPKID="1" ClientID="Admin" FullName="HelpMaster Admin" FullName1="HelpMaster Admin" FirstName="HelpMaster" MiddleName="Pro" LastName="Admin" />
    <row ClientPKID="2" ClientID="AccortiA" FullName="Anna Accorti" FullName1="Anna Accorti" FirstName="Anna" MiddleName="O" LastName="Accorti" />
    <row ClientPKID="3" ClientID="AfonsoS" FullName="Sylvia Afonso" FullName1="Mrs Sylvia Afonso" Title="Mrs" FirstName="Sylvia" MiddleName="G" LastName="Afonso" />
    <row ClientPKID="4" ClientID="AshworthM" FullName="Michael Ashworth" FullName1="Michael Ashworth" FirstName="Michael" MiddleName="F" LastName="Ashworth" />
</Import_Records>
It is not important what the names of the fields (Field1, Field2 etc) are called, only that they are unique.
The second format is probably the most common XML used when working with Excel data files. It requires a specific schema file (XSD) for correct conversion from any Excel data file format using the XML Tools Add-in as follows:
Excel Converted XML Using the XML Tools Add-In Example
Schema example:
<?xml version="1.0" encoding="UTF-8" standalone="yes"?>
<Import xmlns:xsi="http://www.w3.org/2001/XMLSchema-instance">
    <Row>
        <Field1>value<Field1>
        <Field2>value<Field2>
        <Field3>value<Field3>
    </Row>
    <Row>
        <Field1>value<Field1>
        <Field2>value<Field2>
        <Field3>value<Field3>
    </Row>
    <Row>
        <Field1>value<Field1>
        <Field2>value<Field2>
        <Field3>value<Field3>
    </Row>
    <Row>
        <Field1>value<Field1>
        <Field2>value<Field2>
        <Field3>value<Field3>
    </Row>
</Import>
With data example:
<?xml version="1.0" encoding="UTF-8" standalone="yes"?>
<Import xmlns:xsi="http://www.w3.org/2001/XMLSchema-instance">
    <row>
        <ClientPKID>1<ClientPKID>
        <ClientID>Admin<ClientID>
        <FullName>HelpMaster Admin<FullName>
        <FullName1>HelpMaster Admin<FullName1>
        <FirstName>HelpMaster<FirstName>
        <MiddleName>Pro<MiddleName>
        <LastName>Admin<LastName>
    </row>
    <row>
        <ClientPKID>2<ClientPKID>
        <ClientID>AccortiA<ClientID>
        <FullName>Anna Accorti<FullName>
        <FullName1>Anna Accorti<FullName1>
        <FirstName>Anna<FirstName>
        <MiddleName>O<MiddleName>
        <LastName>Accorti<LastName>
    </row>
    <row>
        <ClientPKID>3<ClientPKID>
        <ClientID>AfonsoS<ClientID>
        <FullName>Sylvia Afonso<FullName>
        <FullName1>Mrs Sylvia Afonso<FullName1>
        <Title>Mrs<Title>
        <FirstName>Sylvia<FirstName>
        <MiddleName>G<MiddleName>
        <LastName>Afonso<LastName>
    </row>
    <row>
        <ClientPKID>4<ClientPKID>
        <ClientID>AshworthM<ClientID>
        <FullName>Michael Ashworth<FullName>
        <FullName1>Michael Ashworth<FullName1>
        <FirstName>Michael<FirstName>
        <MiddleName>F<MiddleName>
        <LastName>Ashworth<LastName>
    </row>
</Import>
How to create an XML import file from Microsoft SQL Server
If your source data is currently stored in a Microsoft SQL Server database, you can easily create a source XML file by following one of the methods below.
Method 1 - The quick and easy method (good for small amounts of data)
This first method allow you to run a small SQL query against your SQL Server data to transform it into the required XML format. The query results are displayed within SQL Server Management Studio where you can simply copy and paste them into a XML file.
Please note that SQL Server has a default option of only displaying 2MB of result data. If your query returns more than this (or if you find your results are truncated) then you need to increase the output size limit of XML queries. This can be done by using the Tools > Options menu from SQL Server Management Studio, then selecting Query Results > SQL Server > Results to Grid > XML data option.
Select * From [Table] FOR XML Raw, ROOT('Import_Records')Replace [Table] with the actual name of the database table or view where your data is located. Once the query has run, you can copy the details and paste into a notepad file and then save as XML.
Method 2 - Writing the results of a query directly to an XML file (good for large amounts of data)
-
Copy the following SQL script into a new Windows Notepad file and save it as C:\Temp\SQL Server export script.sql. Make sure you replace [Table1] with the actual name of the database table or view where your data is located.
-
SET NOCOUNT ON :XML ON Select * From [Table1] FOR XML Raw,ROOT('Import_Records') -
Open Microsoft SQL Server Management Studio
-
Open a new query window
-
Execute the following SQL to enable xp_cmdshell. Please read this important security information about doing this. http://msdn.microsoft.com/en-us/library/ms190693.aspx
-- To allow advanced options to be changed. EXECUTE sp_configure 'show advanced options', 1; GO -- To update the currently configured value for advanced options. RECONFIGURE; GO -- To enable the feature. EXECUTE sp_configure 'xp_cmdshell', 1; GO -- To update the currently configured value for this feature. RECONFIGURE; GO -
Then, execute the following SQL to create your XML file. Note that you will need to update the “server\instance” parameter as well as the “database name” parameter to reflect your environment. See http://msdn.microsoft.com/en-us/library/ms162773.aspx for further details about the sqlcmd utility.
DECLARE @sql nvarchar(1000) SET @SQL='sqlcmd -S "server\instance" -E -d "database name" -i "C:\Temp\SQL Server export script.sql" -o "C:\Temp\ExportedXMLdata.xml" -h-1 -y0' PRINT @SQL EXEC Master..xp_CmdShell @SQL -
You should now have a valid XML file located at C:\Temp\ExportedXMLdata.xml that you can use with the HelpMaster import screen.
Importing structured data into Microsoft SQL Server
If have a structured data source that is not XML, but is in another structured format (Access database, Excel spreadsheet, CSV, Tab delimited etc), you will need to convert it into the correct XML schema before HelpMaster can use it as an import file. The best way to create the required XML format is to import it into an SQL Server database table, and then use the SQL scripts listed above to transform it into the XML file that you will use with the HelpMaster import utility.
Microsoft SQL Server has an import utility that you can use to accomplish this task.
- Open Microsoft SQL Server Management Studio and connect to your SQL Server instance
- Expand Databases
- Right-click on your HelpMaster database (or any database that you want to use as the import destination) and select Tasks > Import data…
- The SQL Server import wizard appears
- Follow the on-screen prompts and Microsoft SQL Server help file to import your data (see best practices below)
- Once your data has been imported into a database table, use the SQL scripts above to export your data into the required XML format
- Once your XML export is complete, you may wish to drop the table that was created during the import process
Import Wizard best-practice
It is highly recommended that when importing data into Microsoft SQL Server using the import wizard, that your source data comes from a Microsoft Access database. Using the wizard to import from Excel, CSV or other data formats, while possible, often produces importing errors, data inconsistencies and truncation, and other issues. When data comes from a database in the first place, your data is cleansed and any anomalies are corrected by Microsoft Access. This means that if your data is currently in Excel, CSV or other data sources, you will need to first convert that into Microsoft Access. In most circumstances, you can simply cut and paste your data into a new Access table to achieve this. If your data is very large, you may wish to do this in separate batches.
For example, if you have a Microsoft Excel spreadsheet that you wish to import into HelpMaster, it is recommended that you follow the instruction on this page to do the following :
Excel > Access database > SQL Server table > Export to XML > Import to HelpMaster
Other ways to create an XML file
A fast and reliable way to generate the correct XML file is to use AI. Use a product like CoPilot, ChatGPT, or any other AI tool and upload your .csv data, as well as the XML schema example at the beginning of this page as prompt the AI to generate the required file. Easy!
Finally, you may try using one of the many 3rd party XML conversion tools readily available on the internet. Many tools will convert CSV and other formats to XML. Alternatively, you may try to use Microsoft Excel to load a CSV file and then save it as an XML file in the required format. This will require you configuring the XML mappings. For details on this, please refer to the Microsoft Excel documentation. Remember, you must transform your data into the specific XML schema listed at the top of this page. No other format will be accepted.
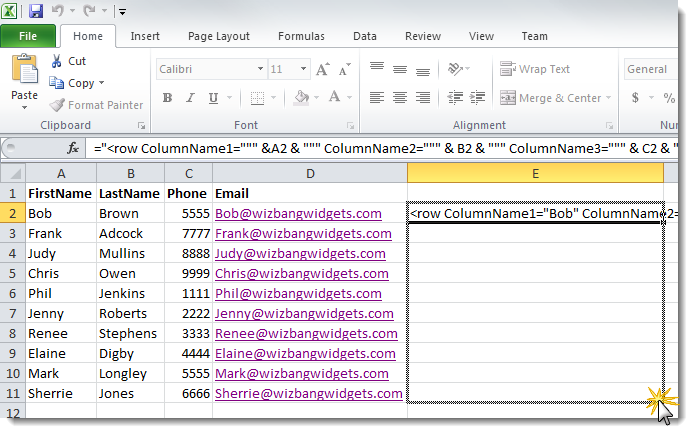
Excel text formula
The following Excel formula may be used as the basis for converting columns into the required XML. The example below will covert the first 26 columns. Update the formula and repeat the pattern for additional columns.
="<row ColumnName1=""" & A2 & """ ColumnName2=""" & B2 &
""" ColumnName3=""" & C2 & """ ColumnName4=""" & D2 & """
ColumnName5=""" & E2 & """ ColumnName6=""" & F2 & """
ColumnName7=""" & G2 & """ ColumnName8=""" & H2 & """
ColumnName9=""" & I2 & """ ColumnName10=""" & J2 & """
ColumnName11=""" & K2 & """ ColumnName12=""" & L2 & """
ColumnName13=""" & M2 & """ ColumnName14=""" & N2 & """
ColumnName15=""" & O2 & """ ColumnName16=""" & P2 & """
ColumnName17=""" & Q2 & """ ColumnName18=""" & R2 & """
ColumnName19=""" & S2 & """ ColumnName20=""" & T2 & """
ColumnName21=""" & U2 & """ ColumnName22=""" & V2 & """
ColumnName23=""" & W2 & """ ColumnName24=""" & X2 & """
ColumnName25=""" & Y2 & """ ColumnName26=""" & Z2 & """/>"
Replace the words “ColumnName1”, “ColumnName2” etc with the names of the actual column titles (this is optional). Use the formula in a cell at the end of your first row of data, and then extend the formula down to transform each row of data.
Copy the results into Notepad, add the header and footer XML tags and you’re ready for importing.
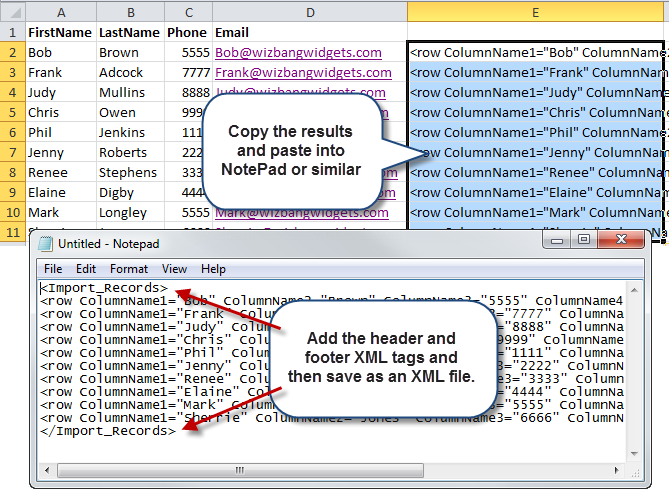
Copy the following header and footer tags for the XML and paste them into the top and bottom of your file.
<Import_Records></Import_Records>Escaping special characters
If using the Excel method above, some text characters will need to be “escaped”, that is, wrapped in special codes in order for them to be acceptable in XML format. Characters such as the ampersand (&) and others will require this.
Once you have your XML output saved, perform a search and replace for all special characters, and replace them with their corresponding escape character values.
Common escape values are:
| Character | Escape value |
|---|---|
| " | " |
| ' | ' |
| < | < |
| > | > |
| & | & |
See also
Database maintenance and backup
Feedback
Was this page helpful?
Glad to hear it! Please tell us how we can improve.
Sorry to hear that. Please tell us how we can improve.