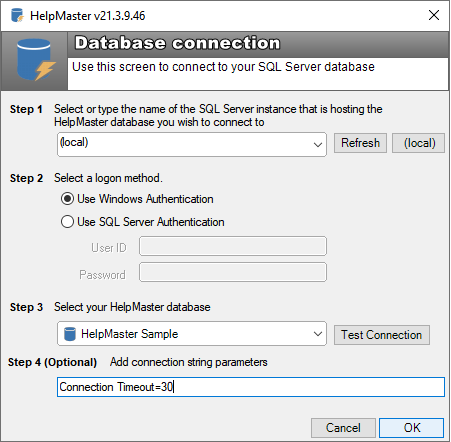
Connecting to a HelpMaster database
HelpMaster uses a Microsoft SQL Server database. Before HelpMaster can be used, you will need to create a HelpMaster database, then connect to this database. Once you have created a HelpMaster database you can connect to it by performing the steps listed below.
Connecting to a HelpMaster database
- From the HelpMaster logon screen, click the Database button. The logon screen will display the list of available database connections
- Click the New button
- Type or select the name of the SQL Server instance that is hosting the HelpMaster database you wish to connect to, click the (local) button to select your local default instance of SQL Server. Enter the name in the format [ServerName]\[SQLInstanceName]
- Check the appropriate logon method for your workplace and select the correct method - Enter user name and password if required
- Select your HelpMaster database from the list
- Enter any additional connection parameters e.g. “Connection Timeout=30” for VPN or slow networks
- Test the connection by clicking Test Connection (optional)
- Click OK to save the new database connection
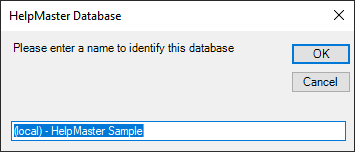
- You will be prompted to give the database connection a common name. This is the text that will appear in the list of available databases
- Entering a valid HelpMaster User name and password and clicking on OK will log you into the selected database.
The “HelpMaster Application Settings.xml” file
HelpMaster stores the Desktop logon information (and other session data) in an encrypted XML file located by default at one of the locations below:
Standard local machine login
- C:\ProgramData\PRD Software\HelpMaster\HelpMaster Application Settings.xml
Citrix/Terminal Server/Remote desktop
- C:\Users[UserProfile]\AppData\Roaming\PRD Software\HelpMaster\HelpMaster Application Settings.xml
<HelpMaster>
  <DashBoard>
    <setting id="FreezeTimer" value="False" />
  </DashBoard>
  <Desktop>
    <setting id="Connection1" value="7wG4PupoJ9n+1dchbgQN/g8CggClRhU0dO2soA7SkMbUAQ5nKyc9qykjfxyZ83nTM5OC9KdzW5o97zjAXLzGCALGJwoJ4HPFGrCI9F53EJcUqRtIV/RChOYbpWfLxq4aO4mgOTxAyAM91B1goKp/eg==" />
    <setting id="Name1" value="HelpMaster Sample" />
    <setting id="LastConnectionIndex" value="1" />
    <setting id="LastUserID" value="EvansM" />
  </Desktop>
  <setting id="LogonScreenLocation" value="1048;368" />
  <setting id="PreLoadCrystalReportDLLs" value="1" />
</HelpMaster>
If you need to run 2 different versions of HelpMaster on the same machine, you can rename the “Application Settings.xml” file to include the major version number. This will allow the corresponding version of HelpMaster to look at this file to extract the database connection.
eg.
Standard filename: HelpMaster Application Settings.xml
Version 21 filename: HelpMaster Application Settings_v21.xml
Version 22 filename: HelpMaster Application Settings_v22.xml
By default, if the “HelpMaster Application Settings.xml” file is not present on a computer when HelpMaster first starts, it will be created and a database connection prompt will appear. Once a connection has been made to the HelpMaster database, the connection string will be encrypted and written to this file.
Deploying the “HelpMaster Application Settings.xml” file with pre-configured database connection settings
In some installation and upgrade scenarious (or if the database location has changed), it may be desireable to pre-populate the “HelpMaster Application Settings.xml” file with the database connection and then “install” this file to another computer.
To prepare this file for deployment/copying to other machines, it is recommended to follow this process:
- First delete the “HelpMaster Application Settings.xml” from the machine that will be used to create it.
- Run HelpMaster on that machine. The Database connection screen will appear
- Enter the database details and connect to the database
- The “HelpMaster Application Settings.xml” will be created and updated with an encrypted version of the database details
Once this file exists with an encrypted database connection, it may be copied onto another computer (or user profile) to the same location. This will prevent the user from seeing the initial database connection screen. Deployment of this file can be manual, or packaged via tools like Microsoft SCCM/Intune, or other deployment scripts/processes.
Note! This file also stores the last logon that was used and the ClientID will be displayed in the logon screen. When deploying this file to other users, it is recommended to blank out the value if this node exists in the XML file. See the example below.
The last user/clientID is EvansM
<setting id="LastUserID" value="EvansM" />Blank out the value
<setting id="LastUserID" value="" />See Also
Creating a HelpMaster database
Feedback
Was this page helpful?
Glad to hear it! Please tell us how we can improve.
Sorry to hear that. Please tell us how we can improve.