Job Template Administration
Templates toolbar > Job Templates section > Job Templates icon ![]()
The administration of job templates is subject to the security permissions assigned to the logged-in user.
When creating, or updating Job Templates, not all fields need to be filled in - these can be supplied later by the person using the template. The concept behind a template is that they act as a starting point for logging the rest of the job. Consider also using undefined codes.
If the template is used by any of the automation services (Email Manager, Recurring Events etc), any blank fields will be filled in undefined codes when they are used by the service.
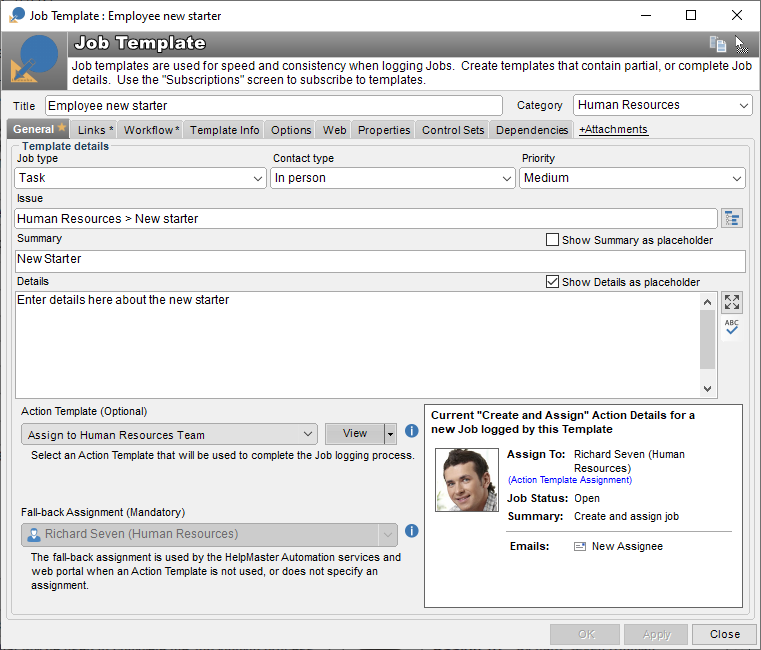
The General tab
Title: The name of the Job Template. Job templates are a core-part of HelpMaster configuration, and are used in the Desktop, Workflow, Web Portal, Email Manager, Priority Manager and Triggered Events. It is highly recommended to adopt a tight naming convention when creating templates. This will assist in future maintenance, identification and use. You may wish to use a naming convention that indicates the scope of the templates, and/or which service/business unit will be using the template. Remember also, that when using Job Templates in the web portal request catalog, the name of the template will be displayed to end-users of the web portal.
Job Type: Optional. Select a Job Type from the drop-down list.
Contact type: Optional. Select a Contact Type from the drop-down list.
Priority: Optional. Select a Priority from the drop-down list.
Issue: Optional. Select an issue classification from the tree (or start typing to access the quick-selection).
Summary: Optional. Provide a text summary for the job. Usually this is left blank for the user to fill-in, however there may be times where pre-filling this field makes sense. Check the Show Summary as placeholder option if you wish to display the summary as a message to the user. This is useful when you want to prompt the user, or to give direction of what to type. The text will appear as a placeholder in greyed-out text. When the user starts typing their summary, the placeholder text will disappear. The users’ summary will be saved with the job.
Details: Optional. Provide the text details for the job. Usually this is left blank for the user to fill-in, however there may be times where pre-filling this field makes sense. Check the Show Details as placeholder option if you wish to display the details as a message to the user. This is useful when you want to prompt the user, or to give direction of what to type. The text will appear as a placeholder in greyed-out text. When the user starts typing their details, the placeholder text will disappear. The users’ details will be saved with the job.
Action Template and Fall-back Assignment options
Remember that logging a job is a 2 step process - (1) logging the job, and then (2) using the action screen to assign it. You can nominate an action template that will be used by the job template. When logging a job via the Desktop edition, the staff member will always be in control of the job logging process and will be able to change the template that is actually used. The Web Portal and Services (Email Manager, Priority Manager, Triggered Events)run in the background as a Windows service, so will use whatever is configured here.
Action Template: Optional. If an Action Template is selected, it will be used to complete the job logging process. This will include any assignment, billing, text, and email configuration that is in the Action Template. This is a very common configuration to use, and should be used when there is a clear relationship between the type of job template that is being used, and an appropriate Action Template that will assign/action the job. If no Action Template is selected here (or the Action Template that is selected does not have any assignment configuration), the Fall-back template will be used to assign the job (see below).
Fall-back Assignment: Mandatory. Select either a Staff Member, or Skillgroup (or both) for the job to be logged to. This configuration will only be used if no Action Template was used in the previous step (or the Action Template that was selected does not have any assignment configuration). This setting ensures that every Job Template will be assigned correctly.
The display box on the bottom-right of the Job Template screen will provide a visual summary of the Action Template / Assignment options that will be used.
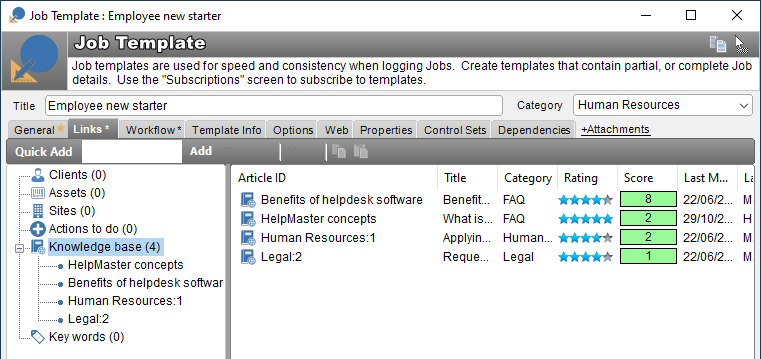
The Links tab
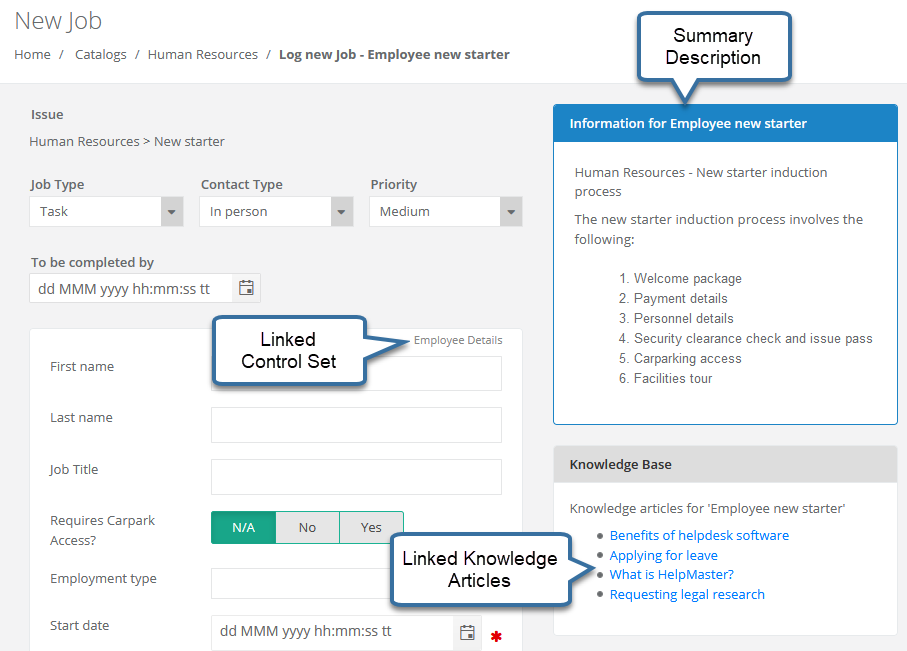
Use the links tab of the template job to associate clients, assets, actions to do (action templates), knowledge base articles and key words to a job. For further information about links, see Linking entities.
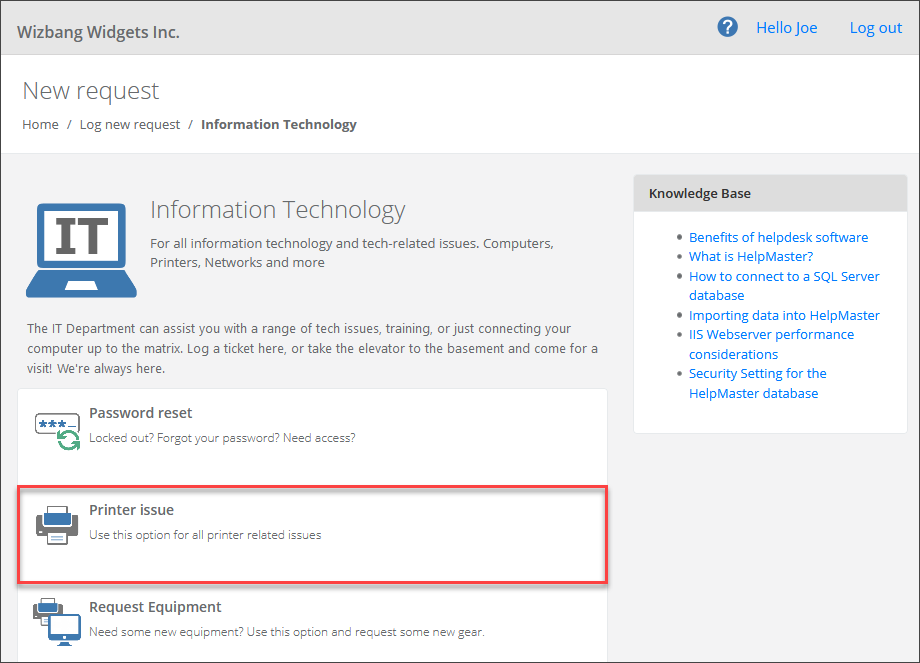
Note: Any Knowledge Base links that are added here will automatically display on the Web Portal as suggested articles when this Job Template is selected from the Request Catalog.
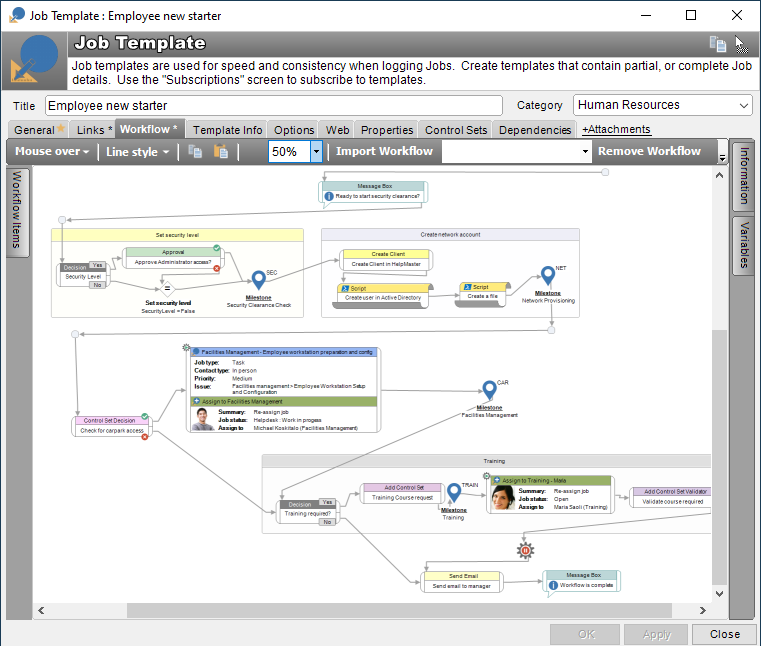
The Workflow tab
One of the main reasons to use Job Templates is to be able to associate it with a defined process that will be used to work the lifecycle of the job that is created. This is achieved via the workflow engine within HelpMaster.
Use the workflow tab of the job template to build/configure the business processes that should be performed for this job type. Workflow can either be created directly inside a job template, or imported from a Workflow Template. Create workflow directly inside a job template if the workflow will only ever be used for that template. Import workflow from a workflow template if the workflow is common to other templates and has been built as a re-usable workflow template.
Job Templates can also implement OnCreate workflow. This is workflow that is automatically run as soon as the job is logged via the Template. This is useful for setting options, sending email, assignment, variable creation and more.
See Workflow for further details about building processes.
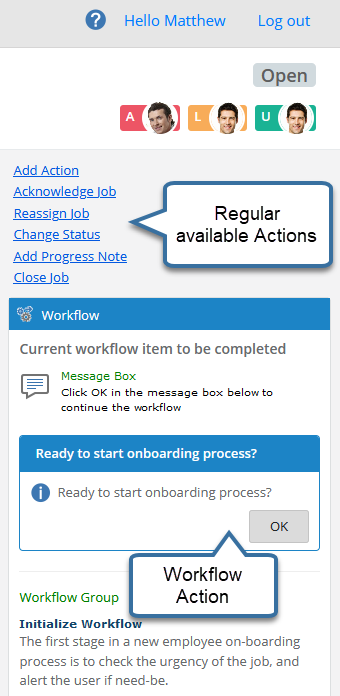
Even though workflow may exist for a job, it is still possible to bypass the workflow and update a job via one of the Available Actions. If you wish to enforce all updates to a job to only be performed via workflow, then the “Hide standard actions” checkbox in the Options tab should be checked. See the Option Tab below.
Template Info tab
This tab is used to store some general information about the job template.
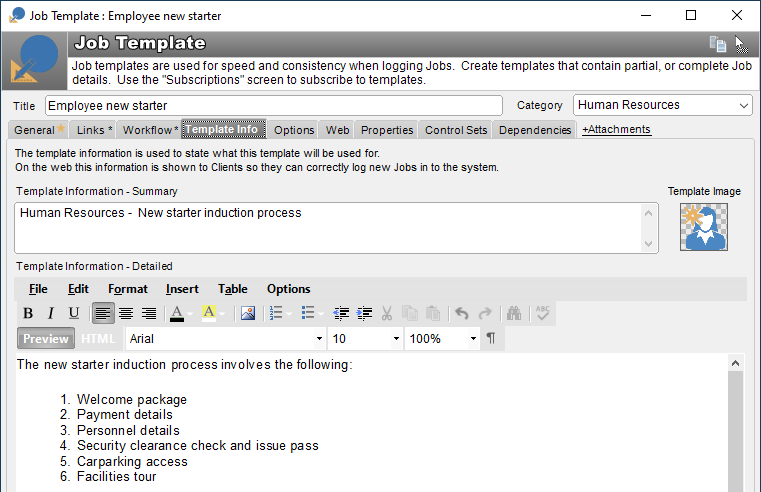
Template Information - Summary: Optional. A text summary of the template that will be displayed on the Web Portal Request Catalog.
Template Image: Optional. Select an image to represent the template. This will be displayed on the Request Catalog on the web portal. This text is rich text/html, so use markup to display on the web portal.
Template Information - Detailed: Optional. A more detailed description of the template. Also displayed on the Web Portal Request Catalog. This text is rich text/html, so use markup to display on the web portal.
This information will be displayed on the web portal when client are browsing the request catalog.
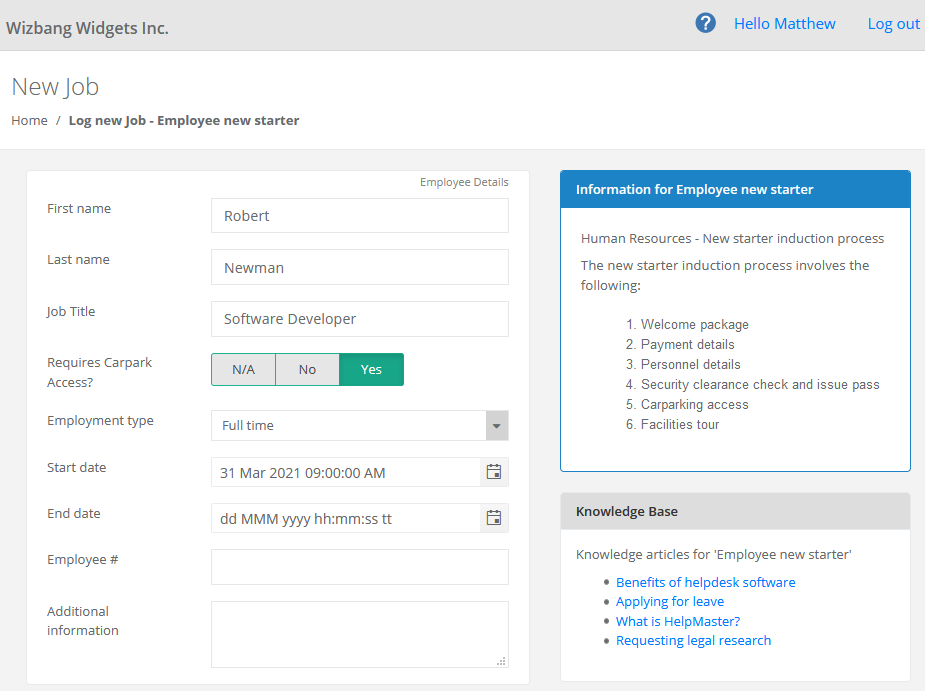
Once the client selects a job template, they can start filling in the details.
The Options tab
Configure further options for the Job Template.
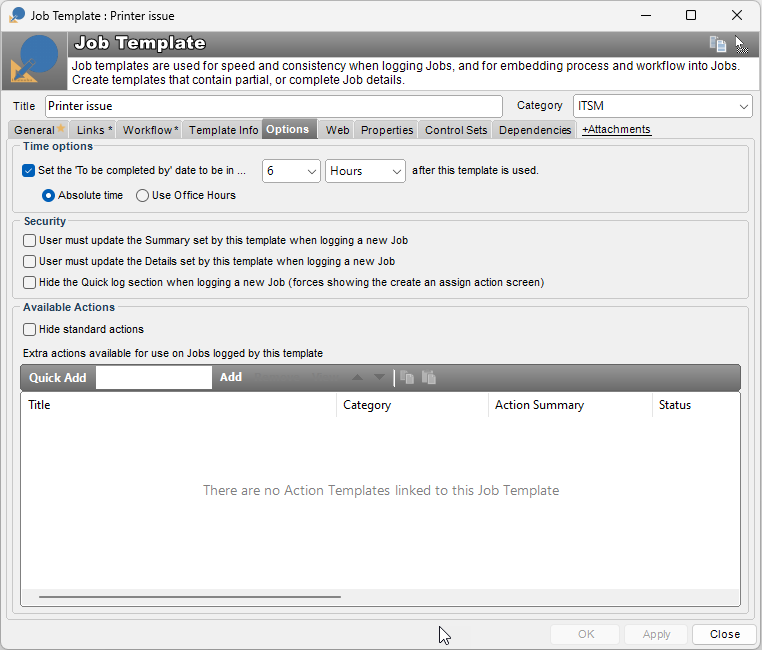
Time Options section
Use this section to automatically set the To be completed by date for a job. For further details about this, refer to Job Templates and the To Be Completed By date
Security section
User must update the Details when logging a new job: When checked, the user must change the details from the original text in the template before logging the job.
User must update the Summary when logging a new job: When checked, the user must change the summary from the original text in the template before logging the job.
Hide the Quick log section when logging a new job (forces showing the create and assign action screen). New for v23. Affects Desktop edition only. By default, the new job screen in the Desktop edition of HelpMaster now enables the job to be logged and actioned/assigned in the one screen (you don’t have to use the Action screen separately) Checking this box will revert the user interface back to previous behaviour where logging a job involves filling in the job screen, and then clicking the Action button to fill-in the Action screen.
Available Actions section
Hide standard actions: Check this to remove the standard actions that will be available once the job has been logged.
Standard actions include:
- Acknowledge Job
- Add action
- Reassign
- Close
These standard actions appear by default as options to update a job once it has been logged. In some scenarios however, it may be desirable to remove these options, and either work directly from the associated workflow, or provide a custom list of available actions.
For example, you may have a job template that has been configured to have a very specific set of actions/updates that you wish to allow. You do not want staff members to be able to close it for example. Instead, the workflow that has been configured for the job template/job has been designed so that it has all of the actions that are available to the job, at the right time.
In this case, you would want to remove the standard default actions, and just use the workflow.
In other cases, a job template may not have workflow, but you require a certain number of actions to be used. In this case, you can create your own list of Available Actions. It is functionality similar to defining a workflow - just another (simpler) way of doing it.
Use the Quick Add, or search feature to add Action Templates to the list of Available Actions. The available actions selected will appear in the order set using the up ^ and down v sort order buttons.
The Web tab
The options on this tab affect the way the job template works on the web portal.
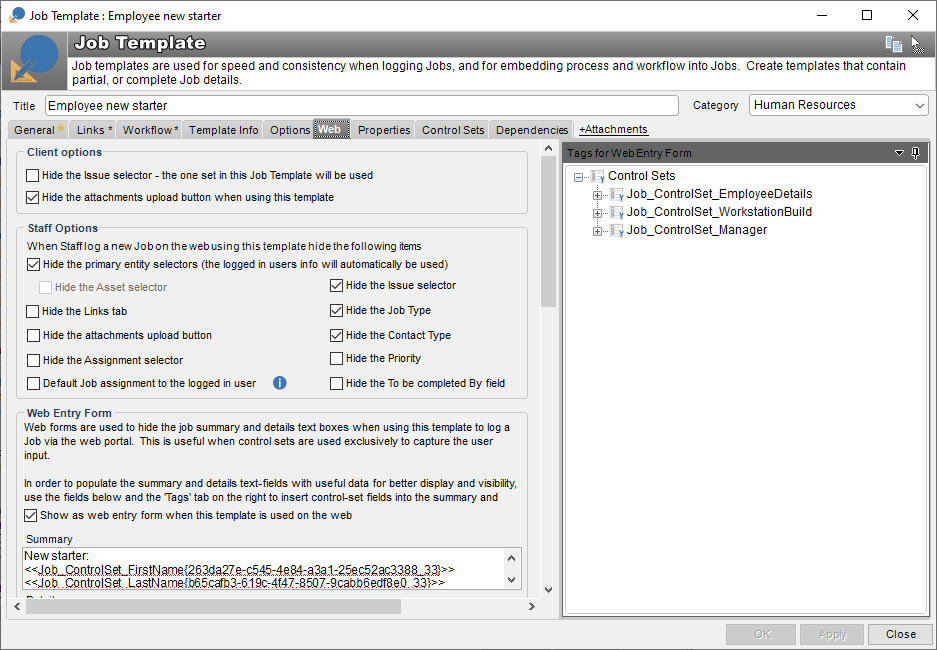
Client Options section
The options here only take effect when a client is logged into the web portal.
Hide the Issue selector - the one set in this Job Template will be used: Check this to hide the issue selector. This is useful if you do not want the client/staff logging the job to be able to change the classification of the job. Conversely, leaving it unchecked allows clients/staff to select their own classification for the job. Note! Only classifications that exist as sub-levels below the value selected in the template Issue can be selected. If the Issue is blank, then any issue classification can be selected when logging the job.
Note also, that Knowledge Base articles are also classified with the same issue classification hierarchy that jobs are classified with. This means that that as the issue classification changes (if allowed), any knowledge base articles linked to that classification will dynamically be displayed as the issue classification is changed by the user.
Hide the attachments upload button when using this template: Check this option to prevent client (end users only, staff will still be able to upload attachments) from being able to upload attachments to the job.
Staff Options section
The options here only take effect when a staff member is logged into the web portal.
Hide the primary entity selectors (the logged in user will automatically be the primary client): This option is useful when there is no need to select a primary client for the job. The client that is logging the job (the person logged into the web portal) will automatically become the primary client for that job.
Hide the Issue selector: Useful for when the issue is set in the template, and should not be changed by the person logging the job.
Hide the attachments upload button: Hides the Upload attachment button on the log job screen.
Hide the Assignment selector: Useful for when the assignment set in the template should not be changed by the person logging the job.
Default Job assignment to the logged in user: Useful for when the job should be automatically assigned to the person logging the job.
Hide the Job Type: Hides the job type pick list. The value specified in the job template will be used.
Hide the Contact Type: Hides the contact type pick list. The value specified in the job template will be used.
Hide the Priority: Hides the priority pick list. The value specified in the job template will be used.
Hide the To Be Completed By field: Hides the To be completed by field. The value specified in the job template (if any) will be used.
Web Entry Form section
Show as web entry form when this template is used Check this to remove the summary and details text boxes when this job template is used on the web portal. This setting only affects the web portal. This option is useful if the job template contains one or more web-enabled control sets that you wish to use as the primary way to capture job information.
If the linked controls sets contain all of the information that you need to capture, sometimes it doesn’t make sense to also display the summary and details textboxes of the job. Using just control sets to capture data can offer a clean looking form.
When this option is used, the job summary and details textboxes can still be pre-filled at the job template level, and the values in the job template will be transferred into the actual job.
Similarly, it is possible to transfer data between any of the control set fields into either the summary or the details textbox by using the “Tags for Web Entry Form” toolbar window and embedding the appropriate control set field tags into the summary/details textboxes in the job template.
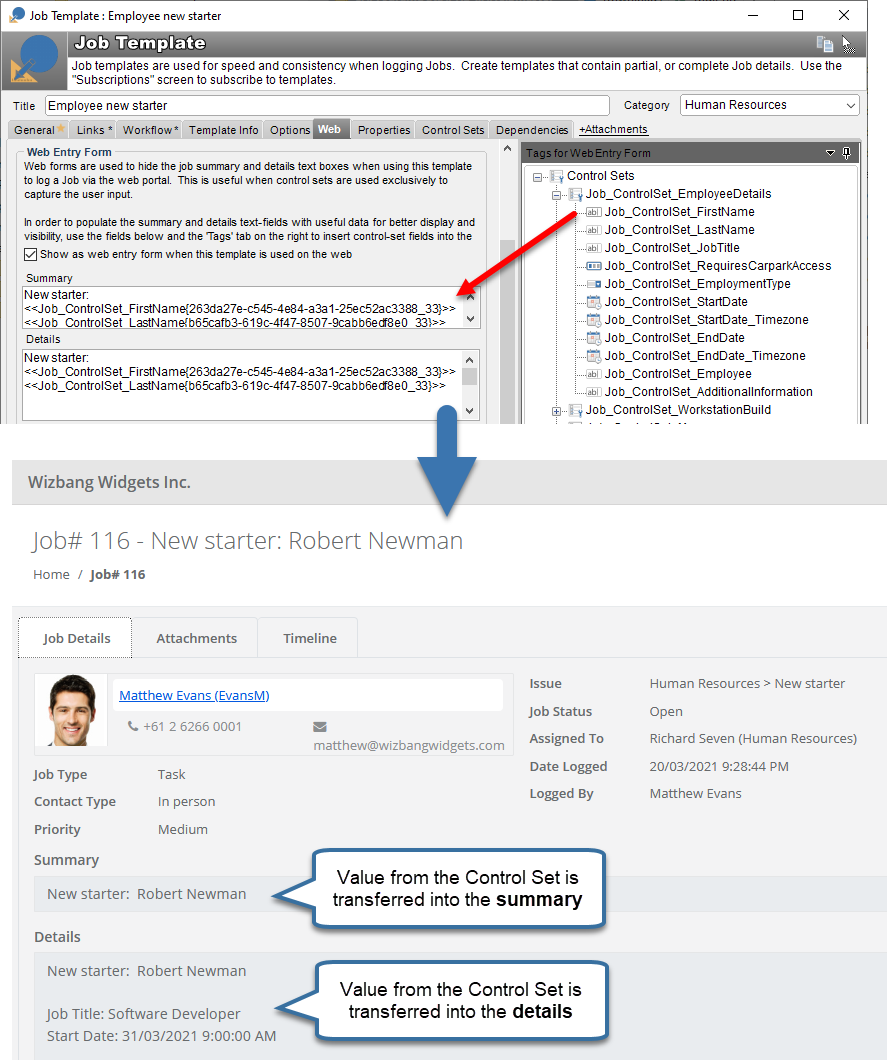
If the Control Set fields ever change, or are deleted, remember to update these settings and/or remove the tag
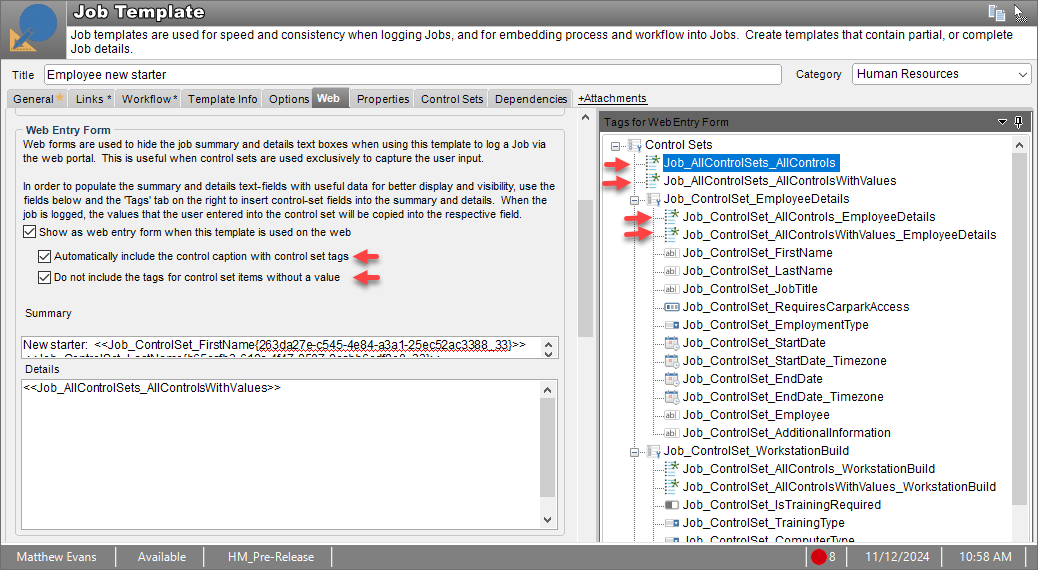
“ALL Job” Control Set email tags
Along with individual control set field email tags, from HelpMaster v24.7 there are four new types of “All” job control set tags. There is also the option to display captions along with any control set email tags or not.
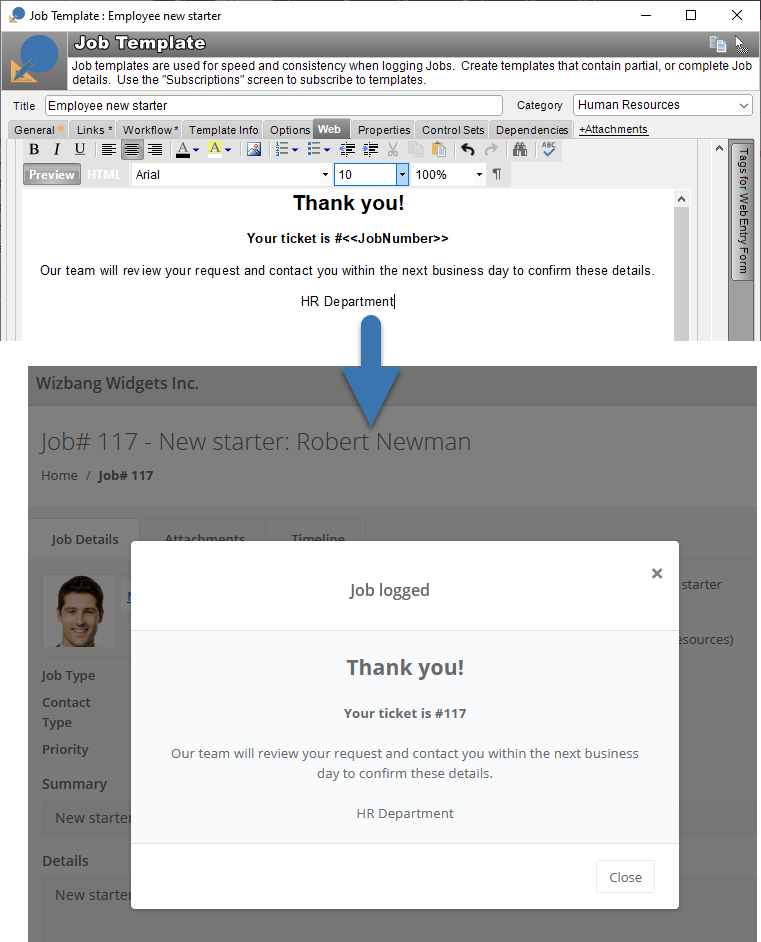
Job Logged Message
This is an optional field. The job logged message is a short message that will be displayed to the user once a job has been successfully logged. You may be useful to provide additional details, links to other sites, or simply as a confirmation message. It works well the the Public Access option below.
Public Access
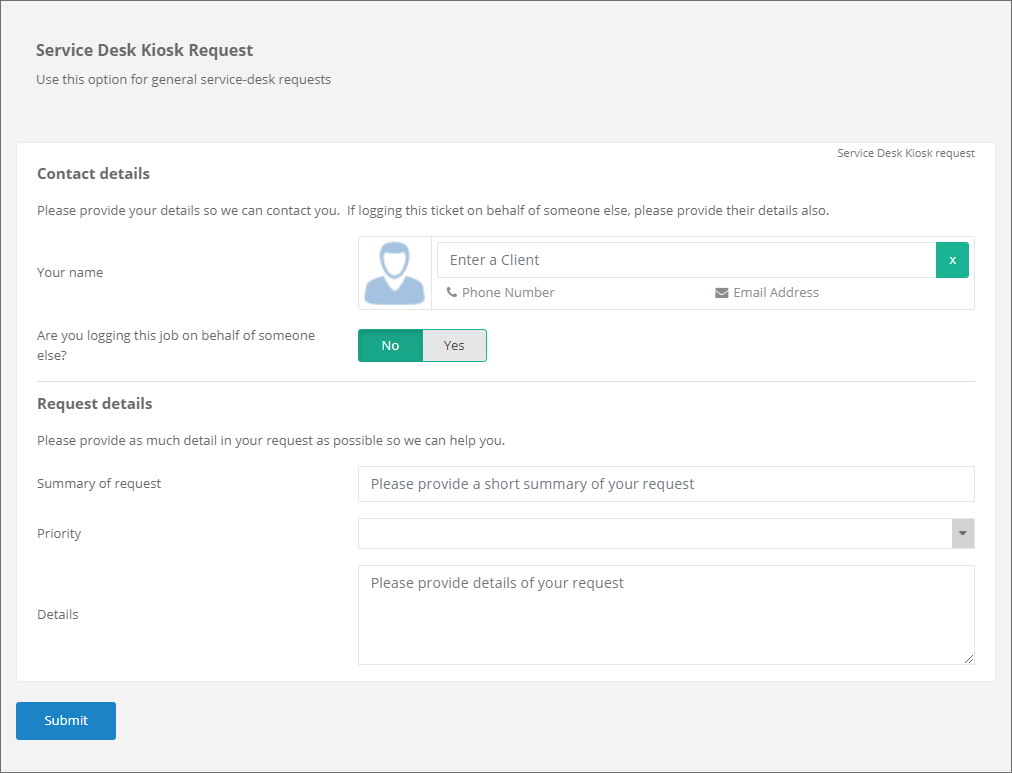
This option allows the job template to be used to log a job by anyone with access to the URL. No login is necessary - the usage of this template to log a job may be completely anonymous and can be used for public-facing scenarios or internal only client job logging.
A public job template is useful for things like Feedback forms, Contact Us, Ask for a quote or Service Desk Kiosk style forms where the end-user doesn’t need to register, or log in to a website in order to fill something in which then logs a job.
A public template may be displayed on other websites via an iFrame. This may be useful for embedding a HelpMaster public job template into a corporate public-facing website for a Contact Us style form, or similar.
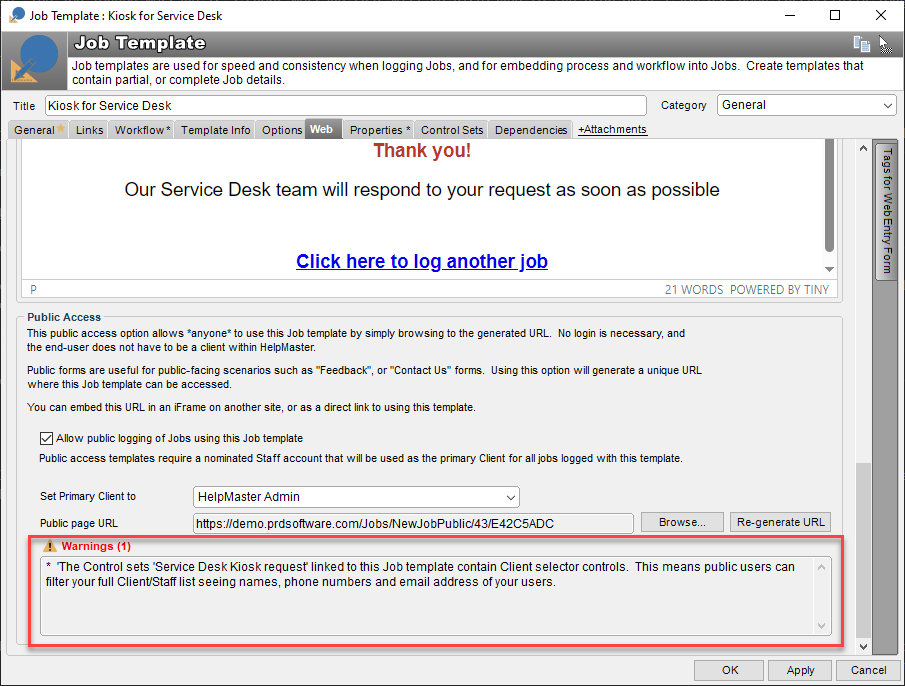
When a job template is configured as a public template, a number of other options may not be appropriate to use with a true public facing web form. In this case, HelpMaster will provide a list of warnings to highlight the issue. For example, being able to view a list of clients, or internal classification structures may not be appropriate for a public template job template. e.g.
Consider using the Web Entry Form option along with the Public Form option for a clean, focussed form that is based entirely on a Control Set design.
The Properties tab
The properties tab displays meta data about the template. Also included is a notes section. Use this to record information about the template. Text entered here will be displayed in the Template Information dock panel.
The Custom tab
Custom details that are filled in at the template level, will be transferred to the job when it is logged.
The Dependencies tab
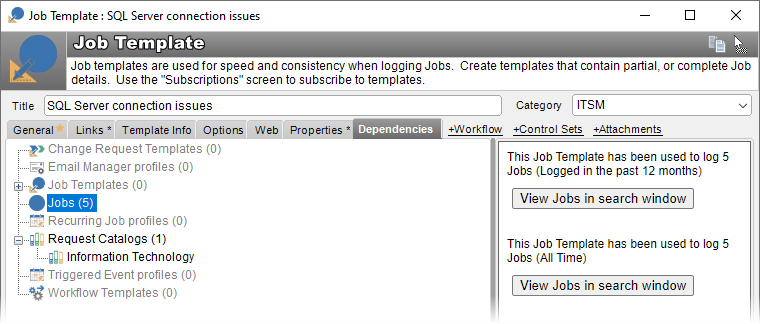
Ues the dependencies tab to easily see the relationship the job template has with other templates and processes within HelpMaster. From Helpmaster v22 onwards, the Jobs tree will also show two buttons labelled View Jobs in search window. Clicking these will either show jobs logged by this template in the past 12 months or all jobs ever logged by this template.
Creating a new Template
- Open the job templates search screen by selecting Job templates from the Templates menu.
- Click on the New button.
- Enter a title for the template.
- Select a priority, job status and type, contact type and issue for the template.
- Enter any details, links, settings etc.
- Click on OK.
Updating a Template
- Open the job templates search screen by selecting Job templates from the Templates menu.
- Select the required template, by using the search facilities of the screen.
- Click on the Update button.
- Make the necessary changes.
- Click on OK.
Deleting a Template
- Open the job templates search screen by selecting Job templates from the Templates menu.
- Select the required template, by using the search facilities of the screen.
- Click on Delete.
- Click on Yes in the confirmation message box which will appear.
When creating job templates, make sure that you have already made the email and action templates that you wish to link to it
See also
Template Information dock panel
Email Template - Control Set tags
Web Portal
Building a request catalog for self-service
Web Enabled Control sets (Linking controls sets to a Job Template for client use on the web portal)
Feedback
Was this page helpful?
Glad to hear it! Please tell us how we can improve.
Sorry to hear that. Please tell us how we can improve.