Create Client with workflow
The create client workflow object allows you to create a new HelpMaster client. The details for the client can be set via calculated variables/scripts, or via user input.

Use
Select the Create Client workflow item from the workflow toolbox and add it to the workflow designer.
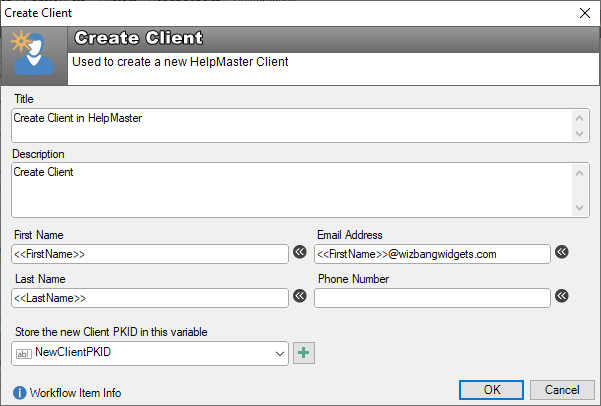
Title: This is the title that appears on the workflow canvas. It is used to identify this workflow object. This will also appear in the message box title bar
Description: A longer description of what this workflow step is about. This description will appear to the user within the workflow panel when this workflow step is activated.
First name: The first name of the new client. This can be left blank, prompting the user to fill it in, or can use a variable that resolves to this value.
Last name: The last name of the new client. This can be left blank, prompting the user to fill it in, or can use a variable that resolves to this value.
Email address: The email address of the new client. This can be left blank, prompting the user to fill it in, or can use a variable that resolves to this value.
Phone number: The phone number of the new client. This can be left blank, prompting the user to fill it in, or can use a variable that resolves to this value.
Store the new Client PKID in this variable: When the new client is successfully created, their unique database ID, or their PKID (Primary Key ID) can be stored in a variable. This is useful is you wish to do further database/SQL look-up, or updates for the newly created client.
Using Variables
When variables are used as place-holders for the client details, the value of these variables will be updated if they are changed by the user.
See also
Use the Client PKID in a further script (SQL/Powershell) workflow operation
Email Manager - Create Client Options
Feedback
Was this page helpful?
Glad to hear it! Please tell us how we can improve.
Sorry to hear that. Please tell us how we can improve.