Updating a job
Throughout the “life” of a job, certain events may be performed by staff in order to resolve and close the job. These events, or actions should be recorded against the job so that an action log is generated and available for review. HelpMaster provides this functionality via the “Action” screen. The action screen allows the staff member to record a wide range of details about the action that they have just performed whilst working on a job. After an action has been entered, a summary of the action is added to the Action Log.
An action is simply an update to a job.
It is generally considered to be best practice to add an action to a job for everything you do in connection with that job. When everything is captured and documented, report statistics become more meaningful, staff and clients are better informed, and the true workload of your staff and organization are recorded.
Icons used throughout HelpMaster
Action

Action template

Different types of actions
HelpMaster provides specific support for the following types of actions:
- Acknowledge job (date stamps a job with a specific action summary type that identifies when a staff member has “seen” a job)
- Re-assign (assigns the job to another staff member)
- Change status (changes the job status of the job)
- Close (closes the job i.e. changes the job status code to “Closed”)
- Add progress notes (add general notes to a job)
- Re-open (re-opens a job if it has already been closed)
The action screen is used for each of the functions outlined above. Furthermore, it is possible to combine several of these actions during the “action”. For example, it is possible to change the status of the job, reassign it, as well as providing progress notes for that job.
The Action screen is displayed below.
The General tab

- The Action template drop-down box. Select a pre-made Action, or simply fill in the blank action screen
- Every action must have an Action summary code. This identifies what type of action this is. When a new job is logged this code is automatically set to Create and Assign Job
- Select a job status
- Assign the job to either a person, or a skillgroup. See Assigning Jobs for further information about this. Use the Queue Check button to display the Queue Check screen
- Type any additional Action notes for this action
- Specify the time taken to perform this action. This information is duplicated on the Billing tab
- Create a Quick Reminder for this action/job
- Specify who should get email, and what type of email content they receive. Use Email Templates, or compose your own
- Check this box to prevent the primary client (may also include Staff users) from viewing the action via the Web Portal. This also affects some email tags
- Check this box to trigger the Action Required tag that is displayed to clients via the web portal. See Job State
When initially logging a job, a checkbox in the top-right corner of the screen will appear. Check this checkbox to add a reference to this job to your saved searches
The Billing tab
See Billing Action Tab for detailed information on this tab.
Properties tab
The properties tab displays meta-data about the action. This tab is useful for determining how the action was added to the job, who, or what created it, and what action template (if any) was used.
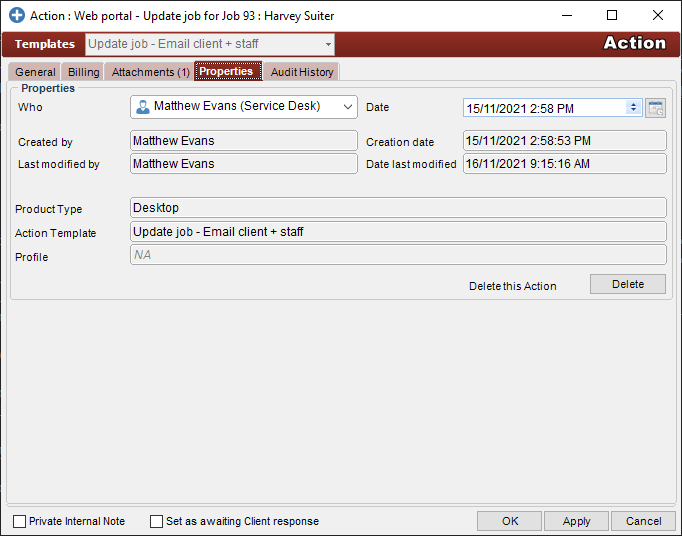
Templates: The action template that was used to perform the action. If this is blank, it means that the action was added manually by a user without using an action template.
Who: The Staff member/user that is attributed to performing this action. This defaults to the person who actually performed, the action, however this can be overridden, and any valid staff member can be selected here.
Created by: The Staff member/user that actually performed the action. See “Who” above.
Last modified by: The Staff member/user that last updated the action.
Date: The date/time that will display in the action log. This may be modified by Staff users if granted permissions.
Creation date: The date the action was created.
Date last modified: The date the action was last updated.
Product Type: The HelpMaster product type that was used to perform the action. This may be one of the following:
- Desktop
- Web Portal
- Email Manager
- Triggered Event
- WebAPI
- HelpMaster API
Profile: Refers to the automation profile that was used to perform the action. This will only be filled in when the action was performed by one of the following:
- Email Manager
- Triggered Event
Delete this action: This option is only available to staff members that belong to an application security role that has this option available. This will completely delete the action from the database. All deletions are tracked via the system event log.
Audit History tab
All of the audit tabs throughout HelpMaster look and work in the same way.
- The summary of the change
- The specifics of the change
Action Security
Adding an action to a job is subject to the HelpMaster security model. This means that some staff members may be granted permission to perform some actions, but restricted to perform others.
Email Integration
An advanced feature of HelpMaster is the ability to send email based on the context and content of each action. The “Email this action to…” section of the action screen displays a number of checkboxes and drop-down boxes that allow the user to select a number of pre-made Email Templates that can be emailed out to the relevant parties to the action. The user can use one of the templates, or compose an email that can be sent.
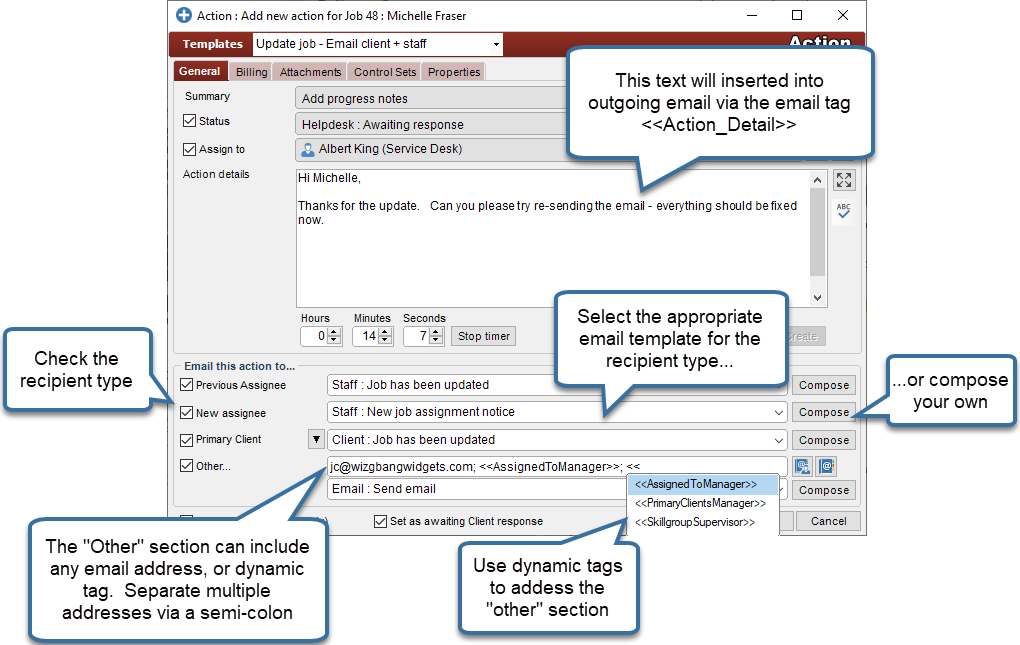
Previous assignee : Refers to the person who has just lost this job. Only applies when the action is a re-assign action.
New assignee : Refers to the person that the job has been assigned to. When the job is being assigned directly to a skillgroup and not to a specific person within a skillgroup, the email will be sent to the Skillgroup supervisor.
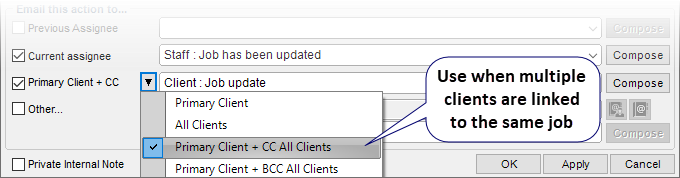
Primary client : The primary clients linked to the job
All clients : All clients linked to a job. See the Job > Links tab for a list of all clients linked to a job
Use the CC and BCC options to send the email to other clients that are linked to the job.
Other… Type any valid email address here. Supports multiple email addresses separated by a semi-colon. Also supports email group names. Use the address book to pick addresses, or groups.
The following dynamic tags are also available. Start typing “«” to display a quick-pick list.
- «AssignedToManager»: The manager of the person that the job is currently assigned to
- «PrimaryClientsManager»: The manager of the primary client of the job
- «SkillgroupSupervisor»: The Skillgroup supervisor of the skillgroup the job is currently assigned to
How Email Templates are populated and displayed in the Action screen
When you design Email Templates, they are generally targeted to a particular recipient type (client, staff, new assignee etc). Each Email Template has a configuration setting that determines which of the drop-down boxes they will appear in. See the Email Setting tab on the Email Template screen for details about this. By default, HelpMaster will populate each of the drop-down boxes for each recipient type with the email templates that are marked for this type AND only those that have been subscribed to by the logged-on user.
At the bottom of each email template list are further options to re-load the list of available templates.

Private Internal Note
By default all updates to jobs will be displayed in the Action Log and will include details about who, what, when and other action details. This will be visible to both clients (via the web portal) and staff users.
Sometimes actions may contain sensitive information that the staff member, or the company as a whole, may not wish the primary Client (this may include both Client and Staff users) using the HelpMaster Web Portal to see. On such occasions, the staff member should mark the action that they have just performed as a Private Internal Note. Then the action will either not be shown with the other actions in the action log, or have the action details removed from view.
Configure the visibility settings in the Action Log Visibility Web Settings screen.
Action Templates
To make the use of actions even easier, HelpMaster supports the use of Action templates. Each helpdesk staff member can create and then subscribe to a number of action templates that can be used and re-used for frequent helpdesk tasks.
See also
Adding an action to multiple jobs
Converting email into an action
Feedback
Was this page helpful?
Glad to hear it! Please tell us how we can improve.
Sorry to hear that. Please tell us how we can improve.