Email Account Configuration
Before any email can be sent via HelpMaster, a HelpMaster email account needs to be configured first.
Note that this is not referring to an actual email account (Microsoft Exchange, Microsoft 365, Google Mail, Outlook etc), this is referring to a HelpMaster “account” that points to your email source. These HelpMaster email accounts act as an abstraction layer between HelpMaster and your actual email system. HelpMaster uses these “HelpMaster email account” “wrappers” to, govern security, email template “from addresses”, and automate use from within HelpMaster.

By creating different HelpMaster email accounts that point to real email accounts, you can configure the workflow, templates and email use within HelpMaster, and control its use and access within HelpMaster according to HelpMaster security, skillgroups, template subscriptions etc. Remember that any security, workflow, or other setting that you configure against these HelpMaster email accounts only exist within the HelpMaster application itself - it does not affect the underlying email system (Microsoft Exchange, GMail, etc) that is being used - the security settings for these will always trump any HelpMaster settings.
New email accounts can be created via the Email Account setup screen.
Creating New Email Accounts
Note, system administrators can prevent users from creating their own personal email accounts via the Global Email Accounts screen.
Personal Email Accounts (if allowed) can be created via HM > My Preferences > Email
Global Email Accounts can be created via Administration > System Administration > Global email accounts
Select the type of email account you wish to create.
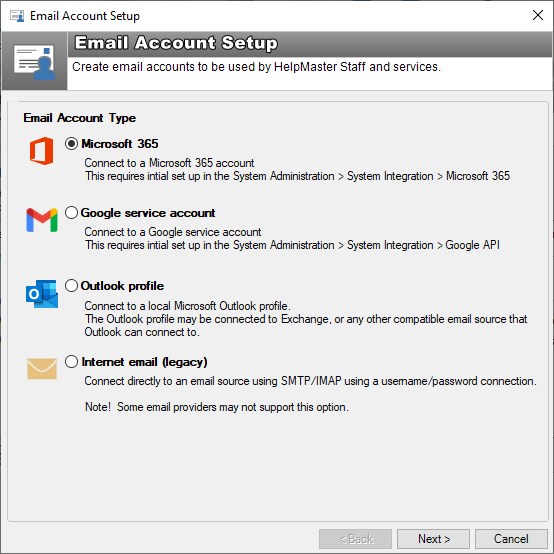
Microsoft 365 Accounts
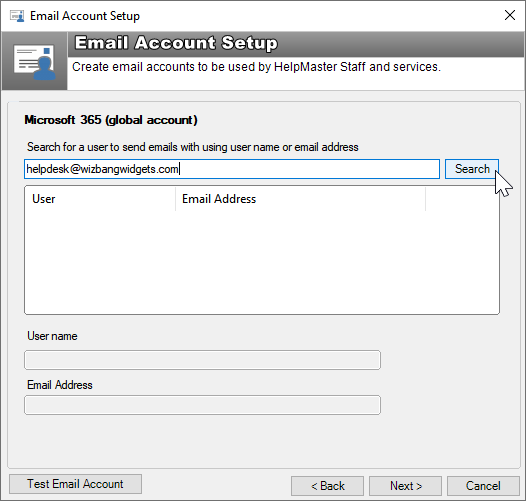
For Microsoft 365 accounts ensure that you have first configured access as outlined at Microsoft 365 Integration, then enter the email address of the account you wish to use and click Search. Select it from the list, click Next > and proceed to Testing an email account.
Google Workspace / GMail Accounts
For Google (global accounts) ensure that you have first configured access as outlined at Google Workspace Integration, then enter the email address of the account you wish to use and click Search. Select it from the list, click Next > and proceed to Testing an email account.
Microsoft Exchange or Outlook Profiles
There are many versions of Outlook available today in light of the recent Cloud revolution and Microsoft 365 / Azure. It is highly recommended that HelpMaster be configured with native Microsoft 365 / Azure email accounts if at all possible. Some versions of Outlook will only work with On-Premise Exchange while others will not. Some do not authenticate with Microsoft 365 correctly causing issues with the HelpMaster Email Manager. The newest version of Outlook does not utilise PST / OST cache files preventing proper connection to the HelpMaster Desktop application or Email Manager module. Please select the version of Outlook to be used carefully using the following chart as a reference, or certain features may not function correctly with certain HelpMaster modules.
Outlook Editions and HelpMaster Compatibility
| Outlook Edition | Outlook Version | Exchange Version | HelpMaster Module Compatibility |
|---|---|---|---|
| Microsoft 365 Apps for enterprise | 2016 - Current | Online Microsoft 365 | Desktop, Email Manager |
| Microsoft 365 Apps for enterprise | “Try the new Outlook” - ON | Online Microsoft 365 | Not Compatible |
| Microsoft 365 Apps for enterprise | 2016 - Current | 2013 - 2019 On-Premise | Desktop, Email Manager (With Registry update below) |
| Legacy Office Editions | 2013 - 2019 | 2013 - 2019 On-Premise | Desktop, Email Manager |
| Legacy Office Editions | 2013 - 2019 | Online Microsoft 365 | Desktop only |
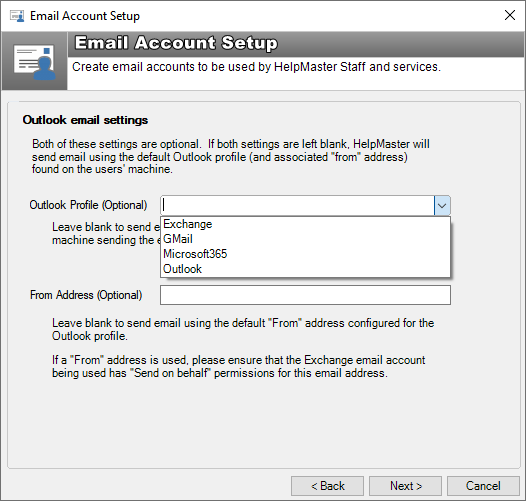
When a Microsoft Exchange or Outlook email account is selected for dedicated email use (e.g. Email Manager only), choose which Outlook profile to use. For a default account (that everyone can use) leave it blank to use the default Outlook profile that is found on each client machine being used. You can also specify a From address to use if you wish to over-ride the default From email address of the profile to another email address. If using this option ensure that the logged in user or service account has Microsoft Exchange/365 Send on behalf of or Send AS email permissions for the default account specified in the Outlook profile.
Click Next > and proceed to Testing an email account.
On-Premise Only (Not hybrid Cloud deployment) Exchange Connections
Since the introduction of Microsoft 365 Office products, connecting to an on-premise Exchange server with these later Office editions may prove difficult. Microsoft have opted to default all connections to Microsoft 365 Cloud based mailboxes with these products. The following registry hack may be required to connect to your on-premise Exchange server using the Microsoft 365 Office version of Outlook.
- Open Registry Editor and browse to the following key HKEY_CURRENT_USER\Software\Policies\Microsoft\Office\16.0\Outlook\AutoDiscover if it exists
- If the full key path doesn’t exist, create new keys from HKEY_CURRENT_USER\Software\Policies\Microsoft to match the above full key path. e.g. Right click to create a “New Key” for Office, then 16.0 etc… until the full key path exists
- From the final key, Autodiscover, right click and create a new Dword (32bit) Value named ExcludeExplicitO365Endpoint
- Right click on the new value and select Modify then change the 0 value to 1 then exit the Registry Editor

- Delete all existing Outlook profiles and then re-launch Outlook. Select the option Manually configure Outlook and click Next
- Select the Exchange icon and continue as normal. Outlook will now connect to your on-premise Exchange server instead of prompting for a Microsoft account sign-in
**Note: If you keep multiple Outlook profiles and you switch back to an M365 connected profile at any time, the registry hack above will no longer be honored until a reboot is performed. This will be apparent when switching back to the on-premise Exchange profile, as the Microsoft 365 account authentication dialogue will pop up again. Any Email Manager profiles using this account will start failing with folder ID errors. Email may also fail to send using this same account.
Legacy SMTP Internet Accounts
Note: If you are currently using SMTP / IMAP based accounts in HelpMaster that connect to Microsoft 365 mailboxes, these accounts will stop working during the first week of January 2023! You must change these accounts to Microsoft 365 based accounts before then to ensure email continues to work from HelpMaster. This especially affects web portal emailing and Email Manager reading of email where this was the only option prior to the release of HelpMaster v22.7.22 on the 22nd of July 2022.
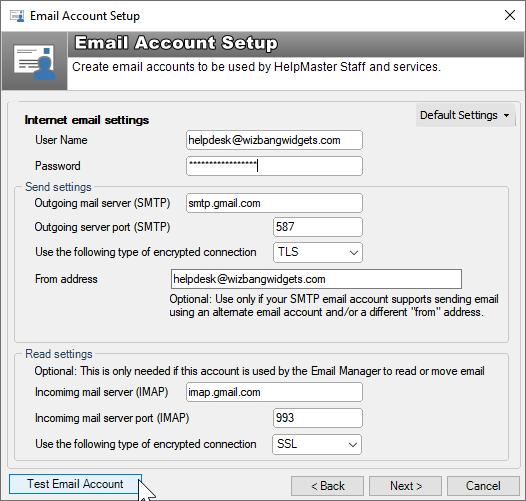
If creating an Internet style email account you will see the following screen. Use the Default Settings menu to select settings for popular cloud email providers like Gmail and Yahoo!
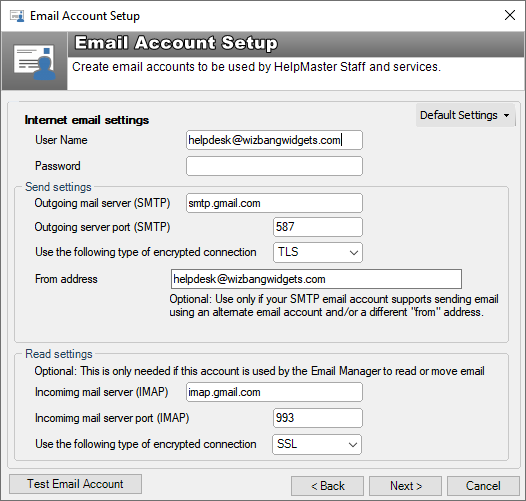
Note: The Read settings are required only for Email Manager account configuration as only it requires read access to email.
For internet-based SMTP/IMAP email accounts, refer to your email provider or network administrator for the correct settings.
Legacy SMTP and IMAP email connections are being phased out by Microsoft 365 Exchange Online and have already been disabled for most tenants. There is currently an opt-out option to keep legacy SMTP/IMAP connections working through to the end of December 2022 to allow transitioning to newer secure protocols, however they have announced that Jan 2023 is the new permanent cutoff date regardless whether opting out or not. See links below
Google Workspace / Gmail announced in 2019 that they were doing the same but have now postponed Less Secure Apps (LSA) access to email (including SMTP/IMAP) indefinitely.
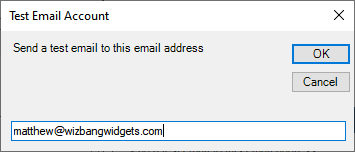
Testing an email account
While creating an email account it can be tested using the Test Email Account button. Enter the test email destination address and click OK.
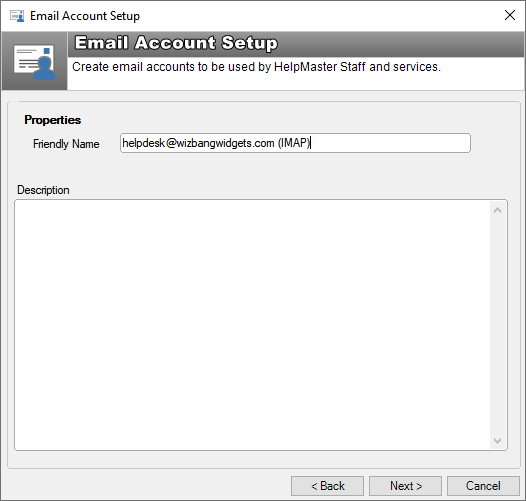
Account configuration options
Specify a Friendly name for the email account and a Description. The friendly name is the text that will be displayed in drop-down boxes and grids when displaying email accounts.
Select where Security access will be granted for the email account.
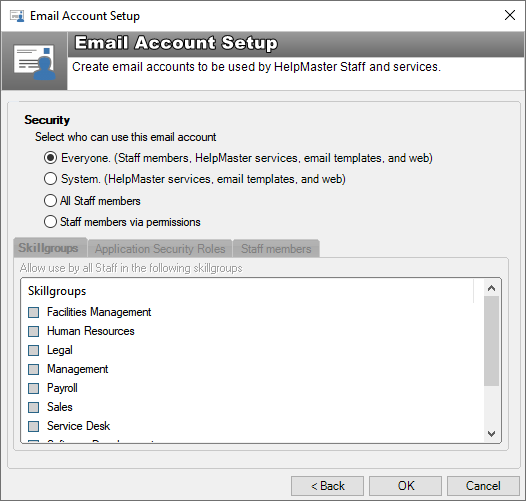
Everyone: This allows the email account to be used by everyone and everything in HelpMaster. All Staff members, Email Manager, Priority Manager, Email Template over-ride.
System: Used exclusively for HelpMaster modules only e.g. Email Manager, Priority Manager, Automation Service, or for Email Templates. When an email account is marked as a system account, it will not show up in the list of available email accounts in a staff members’ personal email settings screen. This is to prevent staff members using email accounts that have been created for other purposes.
All staff members: Similar to the Everyone account, but limited to staff members only. The HelpMaster modules (Priority Manager, Email Manager, etc) cannot use this email account.
Staff members via permissions: Same as for All Staff members but limited by the selection of Skillgroups, Application Security Roles, and individual Staff members.
See also
Convert Email into jobs via the EmailManager
Microsoft 365 SMTP/IMAP Deprecation
Deprecation of basic authentication
Feedback
Was this page helpful?
Glad to hear it! Please tell us how we can improve.
Sorry to hear that. Please tell us how we can improve.