Impact Urgency Priority Matrix
In IT Service Management (ITSM), the Impact/Urgency Matrix is a foundational tool used to determine the priority of incidents, service requests, and problems. By evaluating the impact (how widespread or severe the issue is) alongside the urgency (how quickly a resolution is required), the matrix ensures that resources are allocated efficiently and critical issues are addressed promptly. This structured approach supports consistent decision-making, aligns with ITIL best practices, and helps maintain service level agreements (SLAs) by clearly defining how work should be prioritized across the organization.
The following definitions are offered as per ITIL v3/v4:
- Impact: The extent of the effect (e.g., how many users/services are affected).
- Urgency: The time sensitivity — how quickly it needs to be resolved to prevent further disruption.
- Priority: The derived value that determines response and resolution targets (e.g., via SLA).
A priority matrix for a simple configuration of 3 Impact and 3 Urgency codes might look like this. Note that the table contains 4 Priority codes:
| Impact ↓ / Urgency → | Low | Medium | High |
|---|---|---|---|
| Low | Low | Medium | Medium |
| Medium | Medium | Medium | High |
| High | Medium | High | Critical |
Impact and Urgency codes may be defined as:
Impact
- High: Affects the entire organization or critical services
- Medium: Affects a department or large user group
- Low: Affects a single user or non-critical function
Urgency
- High: Work cannot continue; must be resolved immediately
- Medium: Work is degraded; resolution needed soon
- Low: Minor inconvenience; can be scheduled
A more complex / enterprise style matrix might implement a 5-level scale for Impact and Urgency which offers more granularity. The additional values for Impact and Urgency may resolve to the same 4 Priority Codes, for example:
| Impact ↓ / Urgency → | Low | Normal | Urgent | Very Urgent | Immediate / Critical |
|---|---|---|---|---|---|
| Negligible | Low | Low | Medium | Medium | High |
| Minor / Individual | Low | Medium | Medium | High | High |
| Moderate / Workgroup | Medium | Medium | High | High | Critical |
| Significant / Departmental | Medium | High | High | Critical | Critical |
| Extensive / Enterprise | High | High | Critical | Critical | Critical |
Implementing a Priority Matrix in HelpMaster
As of HelpMaster v25, there is no native functionality for an impact/urgency priority code matrix (it’s coming), however there is a way to implement this functionality by configuring Job Templates, Control Set fields and OnCreate Workflow and a bit of SQL.
The configuration below works best when logging and viewing jobs via the Web Portal. This is because the user interface on the web portal displays Controlsets in-line with the job making it easy to input and view data, whereas the Desktop edition of HelpMaster displays Controlsets on a separate tab.
Create a Control Set for Impact/Urgency
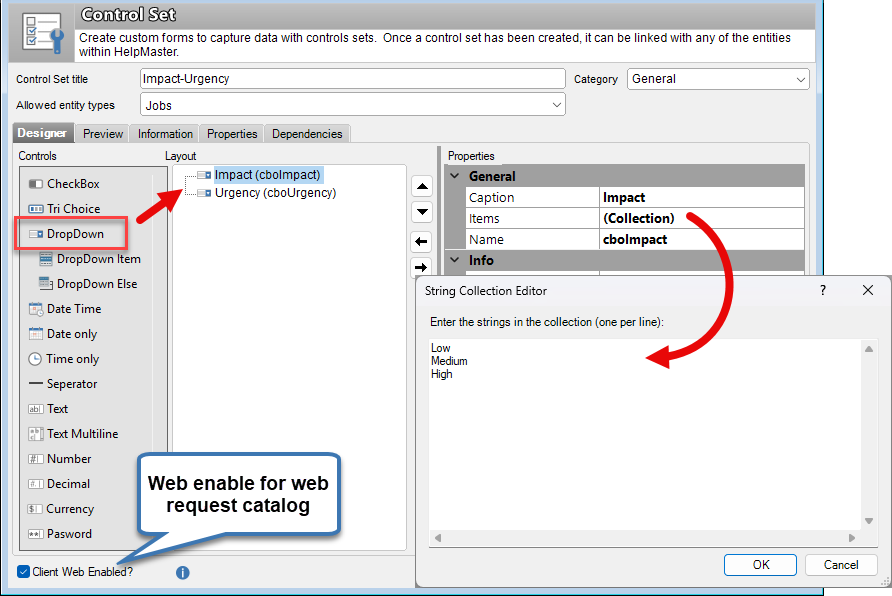
The first step is to build a dedicated Control Set for entering and storing values for Impact and Urgency.
- Call it something like “Impact-Urgency”
- Add 2 “Drop-down” boxes, one for Impact, the other for Urgency. Use the “Items” property to enter the values for each of these categories. Use the values in the examples above, or enter your own values.
- Check the “Client Web Enabled” checkbox. This will ensure that this Control Set will appear on the web portal for clients and staff.
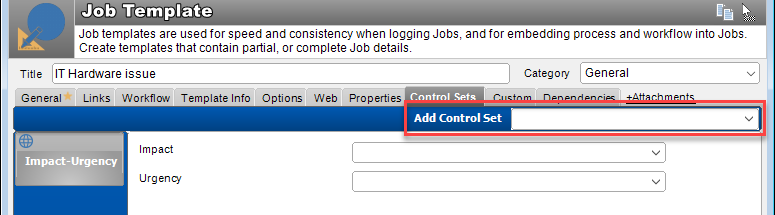
Add the new Impact/Urgency Controlset to Job Templates
Once the Impact/Urgency Controlset has been made, add it to any Job Templates that need to capture this information. Remember that once a Controlset is created, it can be used on one, or many Job Templates. If the “Client Web Enabled” checkbox was checked for the Controlset design, it will also appear on any client-facing Job Templates that are exposed via the Request Catalog.
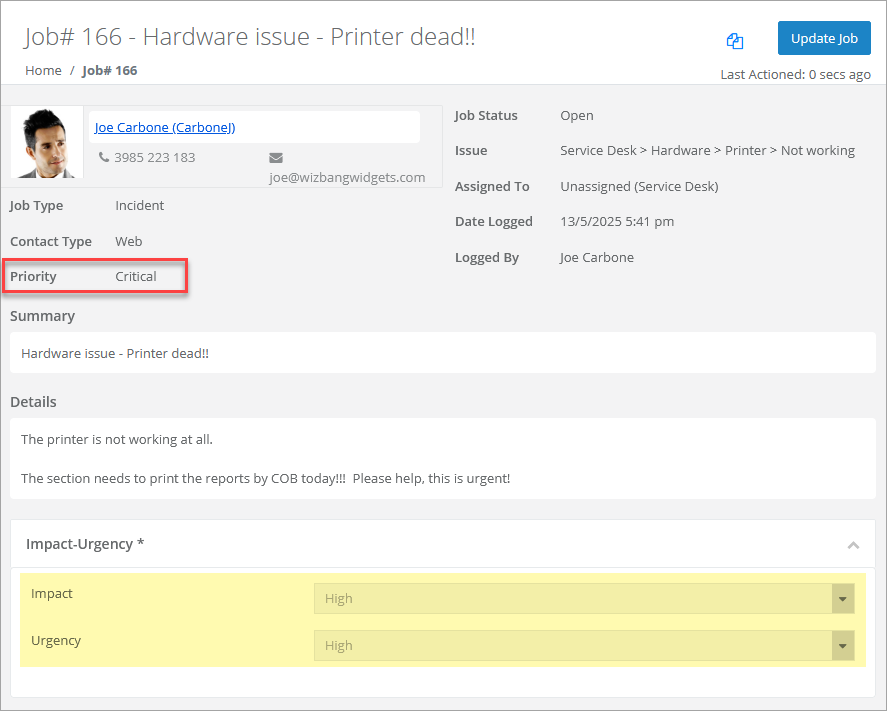
Now when a new job is selected/logged from the Request Catalog, the Impact-Urgency Controlset will appear. During the design of the Controlset, you can also make these fields mandatory if desired.
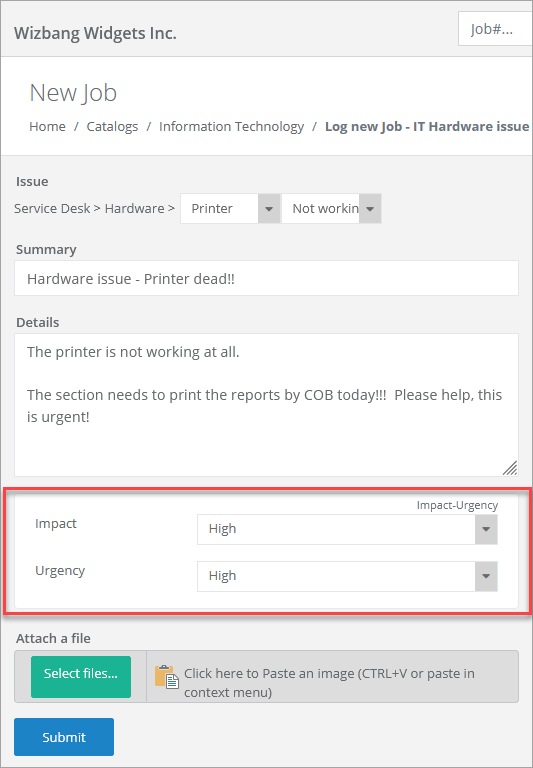
Note! The Priority will be calculated once the job is logged - it is not calculated, or displayed at the point of logging a new job.
Create a database table to store the Impact/Urgency/Priority Matrix
HelpMaster needs a way to look-up and calculate the correct priority for a given Impact/Urgency combination. This step will be performed immediately after the job is logged via an “OnCreate” Workflow process which will examine the Impact/Urgency Controlset data and then use SQL to query the database where the Priority matrix will be stored in a table.
The lookup table needs to be manually created.
To do this, open Microsoft SQL Server Management Studio, connect to your HelpMaster database and copy/paste the following code into a new query window. Execute the SQL code against your HelpMaster SQL Server database to create the table called “tblPriorityMatrix”. Note, you will require sufficient SQL Server permission in order to create tables. Your database administrator may be able to assist.
CREATE TABLE [dbo].[tblPriorityMatrix](
	[Impact] [nvarchar](50) NOT NULL,
	[Urgency] [nvarchar](50) NOT NULL,
	[Priority] [nvarchar](50) NOT NULL
) ON [PRIMARY]
GO
Once the table has been created, it needs to be populated with values for Impact, Urgency and Priority to create the lookup matrix. Use the values given in the first example at the start of this article, or use your own values.
The priority matrix lookup table must be populated with valid values from your Impact and Urgency Controlset values, as well as your Priority codes, otherwise this process will fail and the Priority will not be set correctly. The values must be an exact match.
The example SQL below is for a 3x3 matrix, however you can modify it to become a 5x5 table, or any other combination you like.
INSERT INTO [tblPriorityMatrix] (Impact, Urgency, Priority)
VALUES
  ('Low', 'Low',  'Low'), ('Low', 'Medium', 'Medium'), ('Low', 'High', 'Medium'),
  ('Medium', 'Low',  'Medium'), ('Medium', 'Medium',  'Medium'), ('Medium', 'High',  'High'),
  ('High', 'Low',  'Medium'), ('High', 'Medium',  'High'), ('High', 'High',  'Critical')
Now create the stored procedure which will be used by the OnCreate Workflow to query this table/matrix and update the priority of a job with the correct value.
Copy and paste the following SQL into SQL Server Management Studio and execute it against the HelpMaster database.
-- =============================================
-- Author:		PRD Software
-- Create date: May 2025
-- Description:	Get the Priority for a given Impact/Urgency
-- =============================================
CREATE PROCEDURE [dbo].[stpSetPriority_ImpactUrgency]
	-- Add the parameters for the stored procedure here
	@JobNumber int,
	@Impact nvarchar(50) = '',
	@Urgency nvarchar(50) = ''
AS
BEGIN
	-- SET NOCOUNT ON added to prevent extra result sets from
	-- interfering with SELECT statements.
	SET NOCOUNT ON;

	Declare @PriorityPKID Int = -1

	-- Validate the Job PKID
	IF NOT EXISTS(SELECT PKID FROM tblHelpdeskJobs WHERE PKID = @JobNumber) THROW 50001, 'Job Number not valid', 1

	-- Lookup Priority from Impact/Urgency matrix table
    Set @PriorityPKID = (SELECT qrySystemCodes_Priority.PKID
    FROM qrySystemCodes_Priority
    INNER JOIN tblPriorityMatrix
        ON qrySystemCodes_Priority.Priority = tblPriorityMatrix.Priority
    WHERE tblPriorityMatrix.Impact = @Impact
      AND tblPriorityMatrix.Urgency = @Urgency)

	If @PriorityPKID IS NULL  -- If no priority was found, lookup the "Undefined" value
	BEGIN
		Set @PriorityPKID = (SELECT PKID FROM tblSystemCodes WHERE SystemID = 'sys_priority_undefined')
	END

	-- Now Update the Job to the Priority
	Update tblHelpdeskJobs Set PriorityLink = @PriorityPKID Where PKID = @JobNumber

	RETURN @PriorityPKID  -- Return the Priority PKID to indicate success

END
GO
OnCreate Workflow
The final step in the configuration is to perform the actual matrix lookup and set the priority on the job to the correct value. This is done via an OnCreate workflow process that is embedded into the Job Template(s). Manually create the workflow by following these steps, or cut/paste the XML sample below and then adjust.
Manually Create the workflow
- Open the Job Template, click on +Workflow link to add a Workflow tab (or click on the “Workflow” tab if it’s already there.)
- Click on the drop-down arrow on the “Workflow Type” and Select “Add OnCreate type”

- Add a “Set a Variable from a Control Set” workflow item, and configure to capture the value of the “Impact” value from the Control set into a a string field. These will be used in the SQL lookup.
- Add a “Set a Variable from a Control Set” workflow item, and configure to capture the value of the “Urgency” value from the Control set into a a string field. These will be used in the SQL lookup.
- Add a “Run SQL Script” workflow item.
Copy / Paste the workflow
Copy the following XML and then paste it into the workflow canvas to create the structure of the workflow.
<Settings Type="3">
<Filters>
<Filter Key="StartItem" Type="1" Location="22,26" Group="" />
<Filter Key="key1" Type="21" Location="121,63" Group="" Title="Get Impact" Description="Get Impact" Variable="strImpact" ControlSet="48" Control="90d3ab9f-903b-4186-9b6e-cfe4a5664923" />
<Filter Key="key2" Type="21" Location="182,61" Group="" Title="Get Urgency" Description="Get Urgency" Variable="strUrgency" ControlSet="48" Control="01523b32-fa6e-4ed1-ade3-fbeaf88cdc0d" />
<Filter Key="key3" Type="6" Location="255,65" Group="" Script="EXEC [stpSetPriority_ImpactUrgency] @JobNumber = <<JobNumber>>, @Impact = N'<<strImpact>>', @Urgency = N'<<strUrgency>>'" DisplayTitle="Set Priority" Description="Use Impact/Urgency to calculate and set the Priority" ScriptType="0" DatesLocal="0" />
</Filters>
<JoinLines>
<Line StartType="0" StartKey="StartItem" EndKey="key1" />
<Line StartType="0" StartKey="key1" EndKey="key2" />
<Line StartType="0" StartKey="key2" EndKey="key3" />
</JoinLines>
<PublicVariables>
<Var Name="strImpact" Type="1" />
<Var Name="strUrgency" Type="1" />
</PublicVariables>
</Settings>It should look something like this:
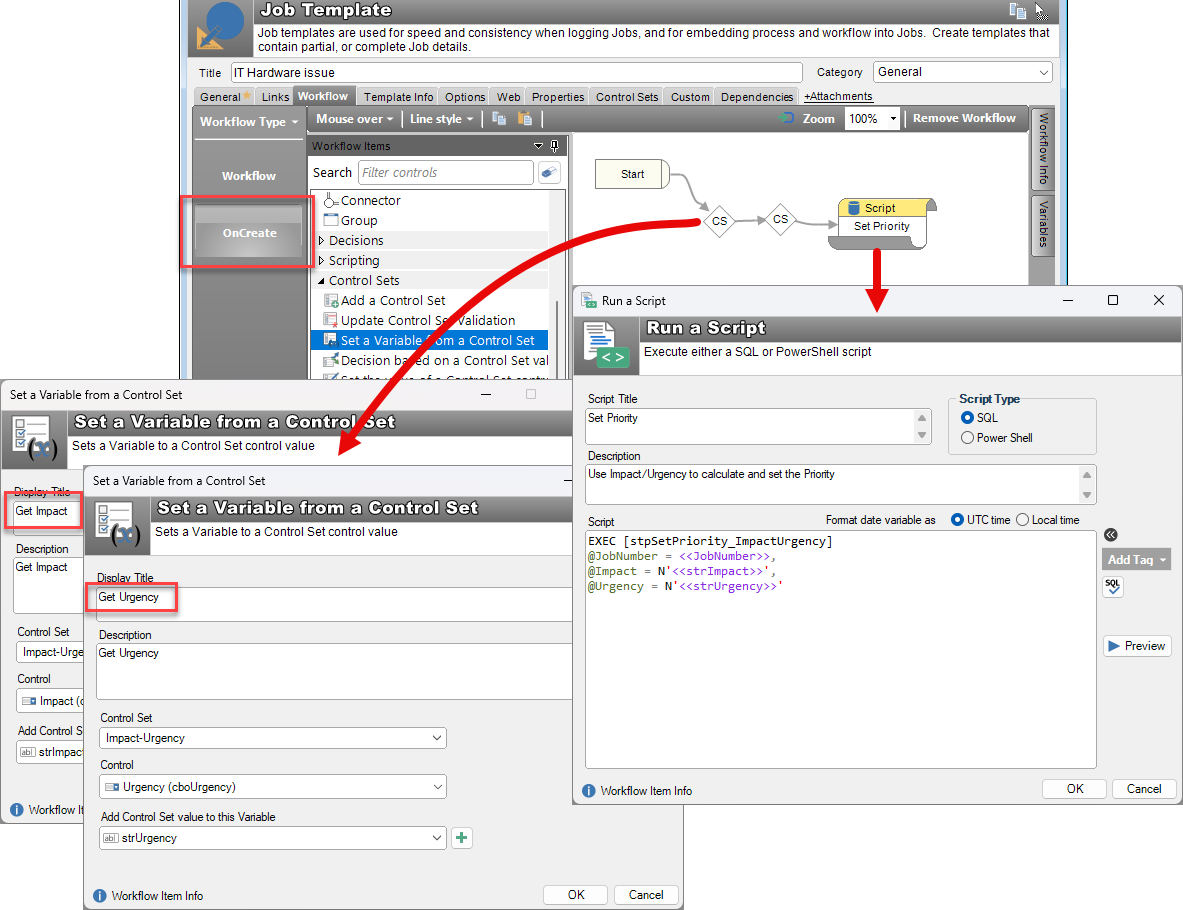
If pasting the above workflow XML, you will need to double-click each of the ControlSet variable items to put them into edit mode and then select the Controlset that you made, rather than the example Control Sets in the XML sample.
Once this new job is logged via the “Submit” button, the OnCreate Workflow will be triggered after the job is logged and the Priority value from the lookup table will be applied to the job.
Things to consider
- If you create or edit, or update values in the Impact/Urgency Controsets, or Priority codes, remember to update the values in the database table “tblPriorityMatrix”, otherwise this process will not work correctly.
- If the lookup table does not contain the exact values that are configured for Impact, Urgency and Priority, the process will not work correctly and the priority of the job will be set to the special “undefined” value. See Undefined system codes
- If an Action Template is associated with the Job Template that is used to log the job, and that Action Template sends email with the «Priority» email tag, this tag will be replaced with a value from the original Job Template, rather than the new calculated matrix value. This is not ideal. This is because the OnCreate Workflow is triggered only after the Job Template/Action Template combination is executed and the job is fully logged. A workaround for this is to configure the Action Template to NOT send email (or use a different Action Template that does not send email). As a work-around, an email can be sent via the OnCreate Workflow via an “Send email” workflow object. This will send out using the correct value for the newly calculated Priority value.
- Why stop at a Priority matrix?. Use this configuration/workflow pattern as the basis for other configuration to adjust jobs, data and more. HelpMaster is a very flexible and configurable system with lots of workflow and processing options. Contact PRD Software for further ideas and assistance.
Key Takeaways
- An Impact / Urgency matrix is a popular and meaningful way to automatically calculate priority for Jobs, Incidents, Tasks, Problems etc.
- Use Control Sets to implement and store data for Impact and Urgency, and add this to Job Templates that should support this information
- Update the Priority Matrix table to change values, or extend options
Feedback
Was this page helpful?
Glad to hear it! Please tell us how we can improve.
Sorry to hear that. Please tell us how we can improve.