Group Managed Service Account
A Group Managed Service Account (gMSA) is currently one of the most secure types of accounts for running Windows Services and IIS Application Pools. The encryption algorithm, allowed principles, account SPNs, and password change intervals may all be defined upon creation. The password is automatically managed by a Domain Controller, resulting in a secure service account that requires virtually no maintenance after it has been created. This type of account can only be created via a PowerShell script.
If the Email Manager service is utilising Microsoft 365 mailbox accounts directly via the Graph API, or the Active Directory Service needs to create / synchronise EntraID users, then Internet access is required on the server hosting these services.
Creating a new gMSA account
Membership in Domain Admins, Account Operators, or the ability to create msDS-GroupManagedServiceAccount objects, is the minimum permission required to complete this procedure.
Prerequisites
The following table lists the operating system requirements for Kerberos authentication to work with services using a gMSA. A 64-bit architecture is required to run the Windows PowerShell commands used to administer gMSAs.
| Element | Requirement |
|---|---|
| Client Application host | RFC compliant Kerberos client |
| User account’s domain DCs | RFC compliant KDC |
| Shared service member hosts | |
| Member host’s domain DCs | RFC compliant KDC |
| gMSA account’s domain DCs | Windows Server 2012 DCs available for host to retrieve the password |
| Backend service host | RFC compliant Kerberos application server |
| Backend service account’s domain DCs | RFC compliant KDC |
| Windows PowerShell for Active Directory | The Active Directory Domain Services Remote Server Administrator Tools |
Create a new gMSA account named “HelpMaster_gMSA”
Before running the PowerShell script below from a Domain Controller, replace the parameter values with your own values.
New-ADServiceAccount -Name HelpMaster_gMSA -DNSHostName HelpMaster_gMSA.domain.local -KerberosEncryptionType AES256 -ManagedPasswordIntervalInDays 14 -PrincipalsAllowedToRetrieveManagedPassword MachineName$ -ServicePrincipalNames http/HelpMaster_gMSA.domain.local/domain.local, http/HelpMaster_gMSA.domain.local/domain, http/HelpMaster_gMSA/domain.local, http/HelpMaster_gMSA/domainBelow is a table outlining the parameter meanings. Recommended values are in bold type.
| Parameter | Meaning | Values |
|---|---|---|
| Name | The name of the new gMSA | Any string without punctuation except underscore (_) e.g. HelpMaster_gMSA |
| DNSHostName | Host name of the account | [-Name].FQDN e.g. HelpMaster_gMSA.domain.local |
| KerberosEncryptionType | Kerberos Encryption types that may be used | None, RC4, AES128, AES256 |
| ManagedPasswordIntervalInDays | Password change interval in days (default is 30 days if not provided) | 14-90 |
| PrincipalsAllowedToRetrieveManagedPassword | The computer accounts of the member hosts or the security group they belong to | e.g. HelpMaster_Server$, IIS_Server$ |
| ServicePrincipalNames | SPNs of the new account to be accepted | e.g. http/HelpMaster_gMSA/domain.local, http/HelpMaster_gMSA/domain |
Additional PowerShell commands
View SPNs (hosts) allowed to retrieve the gMSA password
Get-ADServiceAccount -Identity HelpMaster_gMSA -Properties PrincipalsAllowedToRetrieveManagedPasswordAdd SPNs (hosts) allowed to retrieve the gMSA password
Set-ADServiceAccount -Identity HelpMaster_gMSA -PrincipalsAllowedToRetrieveManagedPassword Host1$,Host2$,Host3$Setting the Services and Application Pools
A trailing dollar symbol MUST be added to the end of a gMSA when replacing standard Service Logon Accounts and Application pool identities e.g. domain\HelpMaster_gMSA$. Password fields must be left blank for the interface to accept the gMSA.
All HelpMaster permissions must also be granted to the new gMSA the same as for a standard service account, see the HelpMaster Service Account for full details.
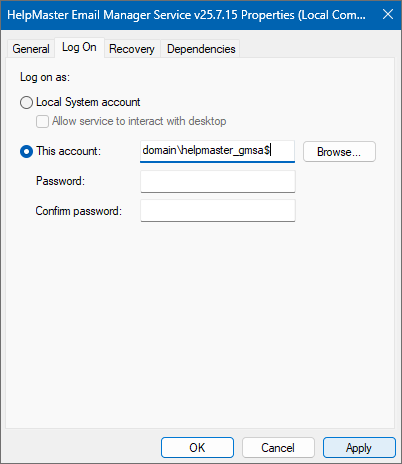
Setting the Services
- Open the Windows Services console and double click on one of the HelpMaster services
- Go to the Log On tab and select This account:
- Enter the gMSA account in the format domain\helpmaster_gmsa$
- Make sure that the Password: and Confirm password: fields are blank
- Click OK to save and close the screen
- Repeat steps 1-5 for the remaining three HelpMaster services
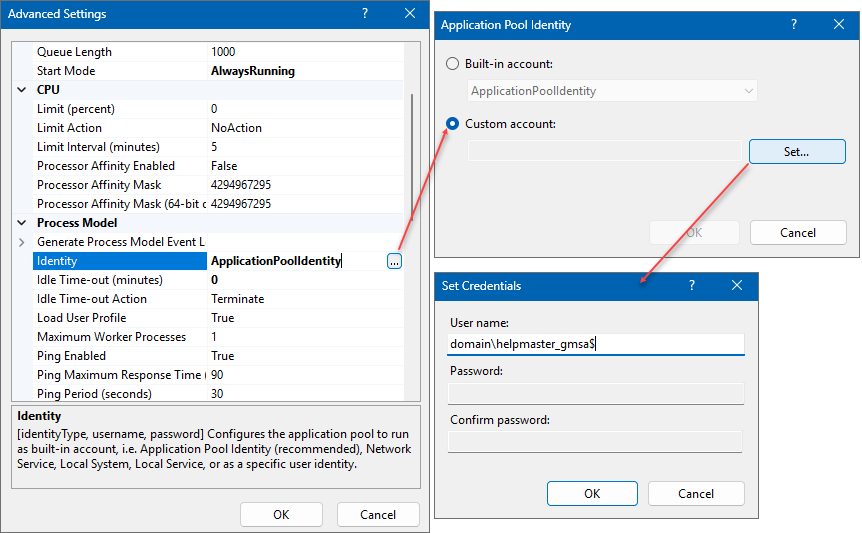
Setting the Application Pools
- Open the Internet Information Services (IIS) Manager
- Expand the server name and select Application Pools
- Right mouse click on one of the HelpMaster web application pools and select Advanced Settings…
- Scroll down to Identity and in the right column click the … button
- Select Custom account: followed by the Set… button
- In the User name: field enter your gMSA account in the format domain\helpmaster_gmsa$
- Make sure that the Password: and Confirm password: fields are blank
- Repeat steps 3-7 above for the remaining two HelpMaster application pools
See Also
Get started with Group Managed Service Accounts - External Microsoft Link
Configuring and Administering Managed Service Accounts - External Microsoft Link
Feedback
Was this page helpful?
Glad to hear it! Please tell us how we can improve.
Sorry to hear that. Please tell us how we can improve.